Optical Illusion Sequence
Optical illusions
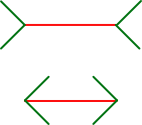
Which red line is longer?
Overview
- Overview
- Big ideas, concepts, facts, & outcomes
- Science content concepts & outcomes
- Inquiry & science process concepts
- Pedagogical overview
- Activities sequence
- Focus questions
- Materials
- Scoring guide suggestions
- Unit activity sequence
- Activity 1 - Go - Stop image & Saturate and Surround Color
- Activity 2 - Hello Red Fox by Eric Carle other colors?
- Activity 3 - Zoomer & tops - color blending And zoomers & pencil flipper - bird in cage illusion
- Activity 4 - Filter light
- Activity 5 - Shadows, black, white, gray illusions
- Activity 6 - Rotoscope
- Activity 7 - Perspective and Warped Window illusion
- Activity 7b - Putting Perspective to work
- Drawing a cube with Perspective & how AI or deepfakes can be discovered
- Activity 8 - Flip book
- Lab notes
- Lab note 1 - Go - Stop image & Saturate and Surround Color
- Lab note 2 - Hello Red Fox by Eric Carle other colors?
- Lab note 3 - Zoomer & tops - color blending And zoomers & pencil flipper - bird in cage illusion
- Lab note 4 - Filter light
- Lab note 5 - Shadows, black, white, gray illusions
- Lab note 6 - Rotoscope
- Lab note 7 - Perspective illusions - Book open or closed, men on platform, tables & Warped Window illusion
- Lab note 7b - Putting Perspective to work
- Drawing a cube with Perspective & how AI or deepfakes can be discovered
- Lab note 7b - Putting Perspective to work
- Lab note 8 - Flip book
- Support materials
- Stop go poster
- Bird & cage pattern
- Sample flip book plane looping page 1
- Sample flip book plane looping page 2
- Flying birds
- Soaring bird
- Black, white, gray illusions - dots move, change size ...
- Perspective illusions - book, table, men at station
- Warped window pattern
- Illusion fact sheet
- Perspective drawings
- Perspective cube
- Chceking AI
A sequence of plans to facilitate a review and develop a deeper understanding that optical illusions are the misperceptions of stimuli received by the eye, or senses, and interpretation of the brain. Includes lesson plans, lab notebook for notes, and support materials.
Related topics of study:
- Spinners & twirlers - tops, zoomers & bird & cage, twirlers, rollers: wheels, wheels & axles, cups, & spheres ( Primary grades and above)
- Light - Unit on light & color to explore the properties of light & how it might create an illusions.
- Magic penny video for example of light refraction
- Books by Michael A. DiSpezio
- Optical Illusion Experiments
- Optical Illusions: Challenge your visual thinking
- Optical Illusion Magic Visual Tricks & Amusements
- Eye-Popping Optical Illusions
Planning information
Learner background information
A plan designed for learners who have prior knowledge in cause and effect, object permanence and are able to appreciate or create perspective drawings and working in groups. They need have very little prior knowledge of illusion. A review of observation & inference activities might be helpful.
Intended learnings & learners thinkings
Content Big ideas, concept & facts, & outcomes
(Source concepts & misconceptions)
Big ideas and specific outcomes:
- Illusion is a thing that is likely to be wrongly perceived or interpreted by the senses.
Concepts and facts
- The illusion of motion results from the brain’s inability to separate a series of rapidly changing images.
- After image is a type of illusion that results when we over-stimulate our vision.
- After images are a result of a temporary depletion of a substance called visual purple.
- Visual purple is a photosensitive pigment within the light-sensitive portion of the eye.
- When our eyes become over-stimulated by visual stimuli, visual purple becomes depleted.
- Perspective is a way of seeing things so that they appear to have depth.
Outcome
Question observations and wonder about their accuracy.
Science concepts: physical, earth, life
Big ideas:
The observations used to describe properties and make explanations are based on how they are observed and can be inaccurate.
Related concepts
- Observations are critical to accurately understanding of our world.
Outcome
- Question observations and wonder about their accuracy as they are used to explain our world.
Anticipated learner thinkings & misconceptions
Think that perception is real.
- Even after measuring the arrows think there is a difference in length.
Inquiry, process, & cross cutting concepts & skills
Inquiry
- When I experiment I collect observations that describe how different properties change (become variables) when objects and systems interact. This helps me make claims, explanations of is happening, and to predict what might happen in the future.
- Inquiry concepts
- Process concepts
- Perspective concepts
cross cutting
Big ideas: See also Concepts & misconceptions
The observations used to describe properties and make explanations are based on how they are observed and can be inaccurate.
Related concepts and facts
- Optical illusions make sense when you remind yourself your eyes are only the beginning of the process of what we see. Our brains are the key in creating images.
- Our brain is constantly trying to protect us from threats in our world by quickly making sense of a 3D world with our2D retinas.
- To do this your brain interprets everything at once and takes shortcut so you can have a quick reaction time to escape dangerous situations.
- When you look at an object, you are really seeing the light that is bouncing off of it and entering your eye, which is converted into electrochemical impulses that your brain interprets as an image
- Our brains can warp straight lines if an object in the middle of them looks like it's drawing closer, because it wants to emphasize it as a potential threat.
- Different colors, and light and dark, can make same sized objects look different or make patterned images look like they're spinning.
- Observational data and reasoning is used to explain interactions. Evidence is something that is observed and can be used to understand what is happening and make predictions about future changes.
- The observations used to describe properties and make explanations are based on how they are observed and can be inaccurate.
- Models are structures that correspond to real objects, events, or classes of
events.
- Explanations are based on observation derived from experience or experimentation and are understandable.
- When you stare at something red for a long time, the cells in your eye adjust by becoming less sensitive to red light. Then when you suddenly look away from the red, your green and blue cells are more sensitive than your red cells and you end up seeing a greenish-blue spot.
- If separate objects are expected to be of the same size, the larger ones are seen as closer. (monocular)
- When you are moving, you use the speed of passing objects to estimate the distance of the objects. Nearby objects seem to go faster while distant objects seem to go much more slowly. (monocular) Motion parallax
- Distance or depth cues that can be processed by either eye alone. (relative size, interposition, aerial haze, texture gradient, linear perspective, motion parallax.) Monocular depth clues
- The use of visual cues to perceive the distance or three-dimensional characteristics of objects. Depth perception
- Produced by manipulating otherwise reliable perceptual depth cues. optical illusion
- The misperceptions of the true characteristics of an object or an image. perceptual illusion
- If separate objects are expected to be of the same size, the larger ones are seen as closer. (monocular)
Outcome -
- Question observations and wonder about their accuracy as they are used to explain our world.
Specific outcomes -
- Are skeptical about their observations.
- Explain how illusions are inaccurate observations.
Other possible concepts
History of science and development of technology - perspective of science
See also Concepts & misconceptions also science, math, technology timeline
- People have practiced science and technology for a long time. Herodotus explained how the temperature of a stream didn't change (was an illusion) about how the temperature during the day changed and not the water in the river.
- Science develops over time.
- Science investigators such as
Scoring guides suggestions (rubric)
(scoring guide)
Top level
- Explains perceptions as interpretations that sometimes are inaccurate (illusions) and cause us to think something is different that it actually is.
- Illusions are like thinking railroad tracks meet in the distance.
Lower level
Strategies to achieve educational learnings
Based on learning cycle theory & method
Pedagogical Overview
Activities Sequence to provide sufficient opportunities for students to achieve the targeted outcomes.
Make sure learners have the prior knowledge identified in the background information.
- Activity 1 - Go - Stop image & Saturate and Surround Color
- Activity 2 - Hello Red Fox by Eric Carle other colors?
- Activity 3 - Zoomer & tops - color blending And zoomers & pencil flipper - bird in cage illusion
- Activity 4 - Filter light to create illusions
- Activity 5 - Shadows, black, white, gray illusions
- Activity 6 - Rotoscope
- Activity 7 - Perspective and Warped Window illusion
- Activity 7b - Putting Perspective to work
- Activity 8 - Flip book - sample plane looping & create one about or with illusion
Focus question
Unit focus question:
How do we organize and communicate our observations to understand our world?
Sub focus questions:
- How do we explain our observation?
- How do we name objects living and non living?
- How do we group (classify) living organisms?
- How do we study and learn about the properties of living organisms?
Materials
- markers, crayons, oak tag, carboard, thread, yarn, cord, straws, pencils, sample illusions,
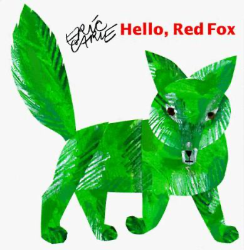
- Hello Red Fox Eric Carle
- Lab note 1 -Go - Stop image & Saturate and Surround Color
- Lab note 2 - Hello Red Fox
- Lab note 3 - Zoomer & tops - color blending And zoomers & pencil flipper - bird in cage illusion
- Lab note 4 - Filter light
- Lab note 5 - Shadows, black, white, gray illusions
- Lab note 6 - Rotoscope
- Lab note 7 - Perspective and Warped Window illusion
- Lab note 7b - Putting Perspective to work
- Drawing a cube with Perspective & how AI or deepfakes can be discovered
- Lab note 8 - Flip book
Resources
- Support materials
- Fact sheet for illusions
- Stop go poster
- Bird & cage pattern
- Sample flip book plane looping page 1
- Sample flip book plane looping page 2
- Flying birds
- Soaring bird
- Black, white, gray illusions - dots move, change size ...
- Perspective illusions - book, table, men at station
- Warped window pattern
- Illusion fact sheet
Lesson Plans
Activity 1 - Go - Stop image & Saturate and Surround Color
Materials
- markers (red & green), drawing paper
- Go or Stop visual, time-watch or clock with second hand
- Lab note
Focus questions:
- Have you ever looked at something and when you look away you still see a remnant of the image?
Learning outcomes:
- Explain the function of the eye and brain in sensing light.
- Explain how light can sometimes be strong enough to cause the retina to continue to send a signal to the brain to be interpreted after the eye is no longer look at the light.
- When you stare at something red for a long time, the cells in your eye adjust by becoming less sensitive to red light. Then when you suddenly look away from the red, your green and blue cells are more sensitive than your red cells and you end up seeing a greenish-blue spot.
Suggested procedures overview:
- Put learners in groups, focus their attention, and assess their initial understanding of the focus questions.
- Activity - Create red mark on a square, stare at it for a minute, and explain the results
Then read Hello Red Fox by Eric Carle and apply what they learned.
Exploration -
- Put learners in pairs.
- Put learners into pairs.
- Have one be the observer and one be the timekeeper.
- Instruct the observer to stare at the Go or Stop image.
- Eye popping optical illusions, Optical Illusions, Optical Illusion Experiments by
- concentrating on a spot within the white G.
- Then have them shut their eyes or look at a white wall and describe what they see.
- Instruct the timekeeper to allow the observer 15-20 seconds to stare at the poster. Then have them write down what after images the observer sees.
- Have them trade roles when completed.
- Have the students write or draw their explanations for what happened.
Invention -
- Discuss their explanations.
- Ask. What is happening? Lead them to the idea that there are two main systems or organs that are being used to interpret the experience - eyes & brain.
- Ask. What is the function of the eyes? sense light and send electrochemical signals to the brain.
- Ask. What is the function of the brain? interpret the electrochemical signals sent to it.
- Discuss what each would have to happen to change what is happening. The eye would signal something different than what is happening. The brain would interpret the electrochemical signal in a less accurate way.
- Introduce them to the illusion fact sheet and tell them they will make their own.
- Have them write their own wording of facts for the function of the eye and brain for seeing what is happening in their world.
- Sample:
- Eyes - sense light and send electrochemical signals to the brain.
- Brain - interprets the electrochemical signal in a less accurate way.
- Color -
- The cones, photo receptors in the eye that are responsible for color vision, can become lazy or tired, resulting in your eye seeing the complementary color.
- Challenge:
- Would any red green shape act the same way?
- How can we find out? Make some shapes and try them to see ...
Discover
- Tell. Take a red or green marker and completely color a square or triangle on white paper.
- Stare at that colored shape for one minute.
- Now look at a plain piece of white paper. “What did you see?”
- Have all groups make shapes and try them out.
- Pass them around and let other groups try them.
- Report the results and note it all shapes cause the same experience.
- Ask. Do you think other colors have a similar affect?
- In the next activity .... we will see if there are other examples of how the retina can be saturated.
Activity 2 - Hello Red Fox
Materials:
- Book Hello Red Fox by Eric Carle
- Lab note -
Focus questions:
- What colors can you look at and when you look away you see a remnant of the image?
Learning outcomes:
- Explain the function of the eye and brain in sensing light.
- Explain how light can sometimes be strong enough to cause the retina to continue to send a signal to the brain to be interpreted after the eye is no longer look at the light.
- When you stare at something red for a long time, the cells in your eye adjust by becoming less sensitive to red light. Then when you suddenly look away from the red, your green and blue cells are more sensitive than your red cells and you end up seeing a greenish-blue spot.
Suggested procedures overview:
- Put students in groups, focus their attention, and assess their initial understanding of the focus questions.
- Activity - Read Hello Red Fox by Eric Carle, discuss, and create some sample colors to explore what happens when observing.
Exploration
- Let's see if we can find other examples of how the retina can be saturated.
- Read the story Hello Red Fox by Eric Carle.
- As you read the story, stop and allow the learners to follow along with the directions given at the front of the book.
- They will see that after staring at the object and looking at a blank white page, they will see that complementary color of the color of the object they were staring at.
- Have them list a color found in the book and then write what color they see after looking at white page.
Invention
- Review and discuss ...
- Add information to their fact sheet.
Discover
Can explore the colors more with their ideas or different colors. Record information on lab notes.
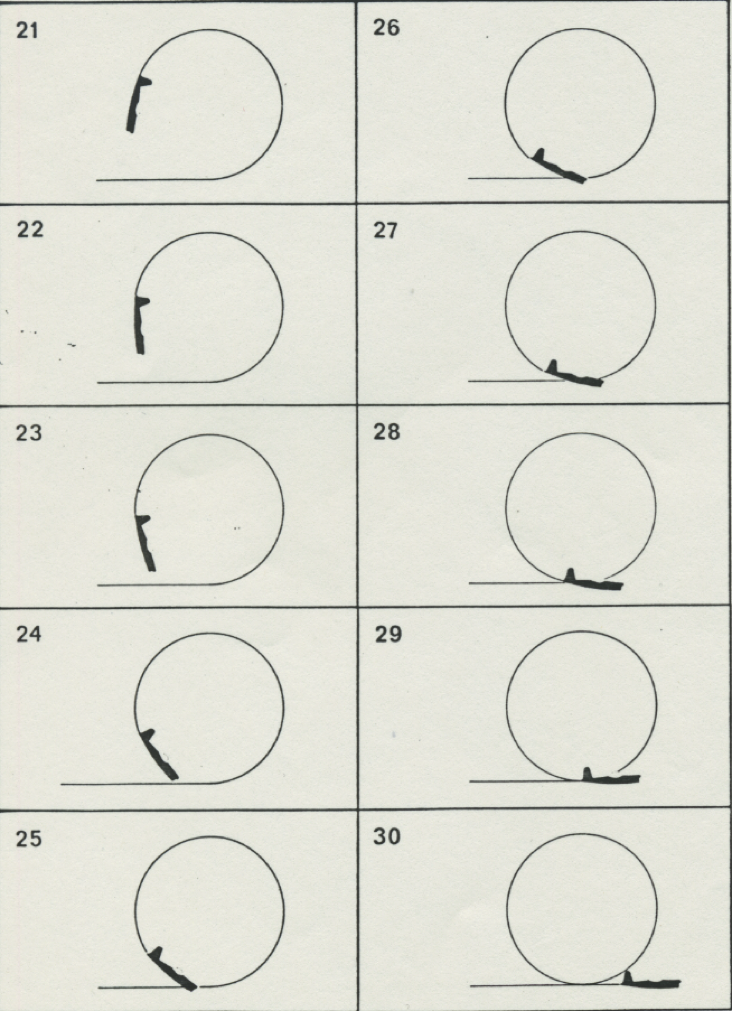
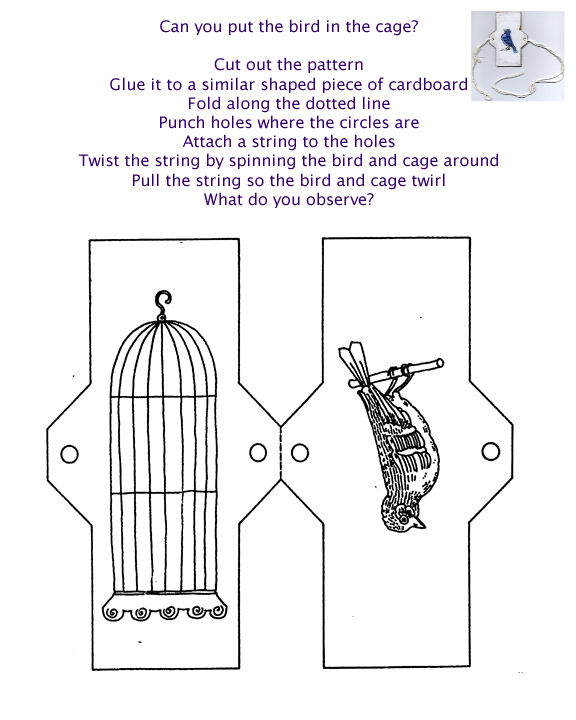
Activity 3 - Zoomer & tops - color blending. Zoomers & pencil flipper - bird in cage illusion
Materials:
- crayons, scissors, poster board, compass, yarn or string (1/2 yard per student) 3”x 5” index cards, straw or pencil, clear tape, stapler
- Lab notes
- See zoomers for ideas on how to make zoomers
- See pattern to make tops with straws & cardboard or plastic discs
- Bird & cage pattern
Focus questions:
- How will the eyes or brain interpret colors when they move?
- How will the eyes or brain interpret pictures when they are exchanged?
Learning outcomes:
- Explain how the brain interprets colors when they move quickly.
- Explain how the eyes or brain interpret pictures when they are exchanged?
Suggested procedures overview:
- Put students in groups, focus their attention, and assess their initial understanding of the focus questions.
- Activity - Make color wheels and use tops or zoomers to move them and blend their colors.
- Use zoomers or pencil flippers to mover two pictures (bird & cage) to rotate them to make the illusion of two things in one place.
Exploration
- Put learners in pairs.
- Ask. How will the eyes or brain interpret colors when they move?
- Ask. How can we find out? Suggest one way to create motion is with a zoomer or a top.
- Ask or tell them to they will make zoomers or tops to test how the brain interprets moving color.
- Have each student cut out a card board circle (approximately 3-5” in diameter) by using a compass or a pattern.
- The front and back of each circle should be divided into pie-like sections of equal size, by drawing lines to show those sections.
- Have them select their colors and completely fill each with one color.
- Poke a small hole at the circle’s center for a straw to make a top or spinner.
- Or poke two holes and thread yarn or string through the hole to make a twirler. Swing the string and circle until the entire length of the string is twisted. Then briskly stretch the string with a firm pull.
- Watch the wheel spin and the colors merge.
- Ask the students why they think this illusion occurs.
Invention
- Review and discuss what happens with the colors?
- Are they actually mixing or is the brain? Eye? ...
- Discuss that the wheel is spinning so fast that the messages being sent to the brain can't be interpreted in real time so instead of seeing each color separately, our brain interprets a mixture.
- What would happen if we take a slow motion picture?
- Is it possible to make is spin at a rate that blends the colors when we look at it, but when we take a video in slow motion the colors are not blended?
Discovery
- Cut out bird & cage pattern.
- Fold the paper in half along the dotted line, and place the set of images over the top of the pencil or make a zoomer.
- Staple the paper on either side of the pencil.
- Rapidly move the pencil in the palms of your hands or work the zoomer and observe the illusion.
- Have the students write down what they see.
- Explain the moving images are being processed buy the brain as being in the same location at the same time.
- Challenge the learners to create other pairs of images for a pencil flipper or zoomer.
Activity 4 - Filter light
Materials
- crayons, markers, construction paper, colored paper, scissors, white paper, poster board, colored plastic food wrap, cellophane, or other transparent colored plastic filters, glass, and clear adhesive tape and glasses frames.
- Lab notes
Focus questions:
- How does colored light change when it passes through different colored lenses.
Learning outcomes:
- Explain how red, blue, green are changed with red, blue, and green lenses.
Suggested procedures overview:
- Put students in groups, focus their attention, and assess their initial understanding of the focus questions.
- Activity - Create colored filter glasses and use them to explore different colors and explain a pattern of how red, blue, and green can be changed.
Exploration
- Tell. Draw patterns of lines and shapes using crayons or markers on paper, construction paper, and colored paper.
- Use them to experiment with both dark and light papers and with various color patterns.
- To create color filtered glasses have learners cut out eyeglass frames from cardboard.
- Create colored filters using colored food wrap and tape these into the lens areas.
- Create glasses with red, green, and blue lenses.
- Tell. Explore:
- How the colors of the patterns drawn on the papers seem to change depending on which glasses are worn.
- Record colors before, color of lens, color with lens.
- Determine pattern.
- Have learners display their results so all can see.
Invention
- Share results and discuss what colors are made with
Discover
- Create a magic trick or illusion using a color filter.
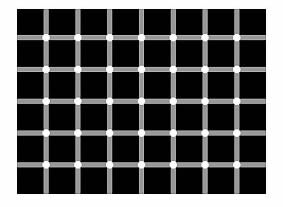
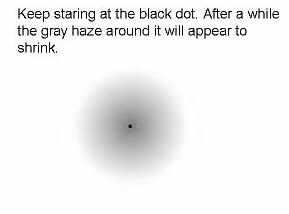
Activity 5 - Shadows, black, white, gray
Materials:
- Count black dots
- Haze illusion
- Dot size illusion
- Lab notes
- Brain fills in Shadow information
Focus questions:
- How do shadows sometimes confuse your brain and create an illusion?
Learning outcomes:
- Explain how shades of gray affect your seeing.
Suggested procedures overview:
- Put students in groups, focus their attention, and assess their initial understanding of the focus questions.
- Activity - Explore different illusions created from black, white, and gray to discuss and explain how the brain uses previous experiences to create understandable sensible explanations for what it is processing.
Exploration
- Put students in groups
- Share and explore different illusions created from black, white, and gray.
- Discuss and explain how the brain uses previous experiences to create understandable sensible explanations for what it is processing.
Invention
- Select some black, white, gray illusions to describe what might be happening when visualizing and interpreting their selected illusions.
- Write a summary of what you learned about black, white, gray illusions
Discover
Activity 6 - Rotoscope
Materials
- Rotoscope, sheet of images sheets, construction paper, ruler, pencil, scissors, paste, tape, turntable.
- Bird images & soaring bird silhouette
- Lab notes
Focus questions:
- How to make images create the illusion of motion.
Learning outcomes:
- Describe how moving still pictures can create an illusion of motion.
Suggested procedures overview:
- Put students in groups, focus their attention, and assess their initial understanding of the focus questions.
- Activity - hare the images of birds and soaring bird and challenge them to make a Rotoscope to see what the motion of a still picture will will look like with a Rotoscope.
Exploration
- Organize learners into groups and pairs.
- Describe what a rotoscope is. It is a two part devisce. Outside hides a cylindrical device that has a painting or an illustration on it so that it can rotate when a person looks through a window to see parts of the illustration on the rotating cylinder. a little bit at a time.
- Review a design process.
- Discuss different ways to design and create a Rotoscope.
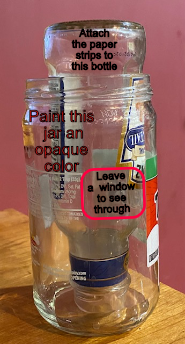
- Collect materials and create a Rotoscope. Rotoscope can be made in two general ways.
- Get two containers that fit inside each other (maybe jars). For example two jars, paint one leaving a small part clear to peak inside. Attach the bird strip to the smaller jar and set it inside the other so that you can see the birds through the unpaint3d opening. Peek through the window and spin the smaller jar.
- Use a box, cylinder, and turntable. Attach the pictures of the birds or bird to a cylindrical container, place it on the turntable. Cut a window in the side of the box to view the birds. Place the box over the turntable and cylinder. Spin the turntable and view the bird or birds...
- Use one or two two strips of bird images to fill in the inside rotating part of the rotoscope.
- Insert it into the larger exterior of the rotoscope.
- Spin the rotoscope.
- Record the observations.
Invention
- Regroup as a class and groups demonstrate their projects.
- Ask. How did you design work?
- What did you see.
- Wa sthere or wasn't ther an illusion of flight or motion?
- What made it seem real?
- What didn't make it seem real?
- How could it be improved?
- Or,To get better, you need to design something that can both move in place and through space. Yureka! video!
Discover
Activity 7 - Perspective and Warped Window illusion
Materials
- Perspective illusions -
- Warped window, 2-4 ft. of string, tape, straws, pen, and scissors.
- Spinning window perspective and straw illusion video
- Lab notes
Focus questions:
- Is it possible to use motion to make an illusion?
Learning outcomes:
- Create a warped window illusion and explain how our brain interprets it.
Suggested procedures overview:
- Put students in groups, focus their attention, and assess their initial understanding of the focus questions.
- Activity - Share perspective illusions and discuss how the eyes and brain respond to create an illusion.
- Cut out warped window pattern, assemble, operate, and discuss how the illusion is created in our minds.
Exploration
- Organize learners into groups and pairs.
- Observe some perspective illusions -
Invention
- Discuss how the eye and brain are responding to create the illusion.
Discover - warped window illusion
- Have the learners tape the end of the string which is attached to the perspective window to the edge of the desk, making sure the perspective window is at eye level when sitting on the floor by their desks.
- Twist the string 30-50 times in order to get the proper rotation speed
- Have the them stand 2 ft. away from their false-perspective windows hanging in the doorway or hanging from their desks and cover one eye.
- Have them watch the rotating window, focusing on the narrow end of the window.
- Have them write down their observations.
- Ask the them why the straw seems to be passing through the perspective window.
- Have the them write or draw their explanations for what happened.
- Mention that in the next activity they will explore a flip book to see how it works and then they will make a flip book with an illusion in it.
7-b Using perspective to make a cube and to answer, is it fake?
Putting Perspective to work to make a cube and find fakes - Lab note 7b for Drawing a cube with Perspective & how AI or deepfakes can be discovered.
Activity 8 - Flip book
Materials
- paper, stapler, colored pencils, markers, scissors
- Flip book page 1 & Flip book page 2
- Lab notes
Focus questions:
- How can you use motion and the idea that images on the retina persist to create motion?
Learning outcomes:
- Describe how a flip book creates an illusion of motion.
Suggested procedures overview:
- Put students in groups, focus their attention, and assess their initial understanding of the focus questions.
- Activity - Cut out the flip book Loop, create a flip book, and explain how it works.
- Create a flip book with illusions in it.
Exploration
- Organize learners into groups and pairs.
- Give them the Loop flip book and have them assemble it.
- Operate flip books.
Invention
- Regroup as a class share flip books, and discuss how it works.
Discover
- Challenge them to create a flip book that uses something they learned about illusions.
- Create illusion flip book.
- Share and discuss.
Lab Notes for activities
Lab notes 1 -
Materials
- Stop go visual
- Lab notes
Challenge
Look at the stop go visual and explain what happens when you look away.
How does the eye function?
How does the brain process the information it receives from the eye?
Explain how the retina interacts with the brain so you think there is an image where there isn't.
Lab notes 2 - Hello Fox
Materials
- Colors, paper, book Hello Fox, by Eric Carle
Challenge
Pick some colors and describe how they interact with the brain when looking away.
Lab notes 3 - Zoomer & tops - color blending And zoomers & pencil flipper - bird in cage illusion
Materials
- Disk patterns, string, paper, scissors, markers or crayons, bird & cage pattern, straws, pencils
Focus questions:
- Will colors blend when they are moving?
Challenge
Create zoomers or tops with different colored discs and discover how colors change.
Describe you plan and results:
Challenge
Put the bird in the cage.
Describe you plan and results:
Lab notes 4 - Filter light
Materials
- Crayons, markers, construction paper, colored paper, scissors, white paper, poster board, colored plastic food wrap, cellophane, or other transparent colored plastic filters, glass, and clear adhesive tape and glasses frames.
Focus questions:
- How do different colors change with different filters?
Challenge
Explore with different colored filters and different colors and discover a couple of patterns.
Describe a plan:
| Color on surface | Color of filter | Color observed |
|---|---|---|
|
||
|
||
|
||
|
||
|
||
|
Lab notes 5 - Shadows - Black, white, gray
Materials
- Several black, white, gray illusions
Challenge
Expain how we process black, white, gray illusions
Pick a black, white, gray illusions, illustrate it and describe what might be happening when visualizing and interpreting it.
Write a summary of what you learned about black, white, gray illusions
Lab notes 6 - Rotoscope
Materials
- Materials to design and create a rotoscope. Containers, turntable, flying bird strip, soaring bird strip
Challenge
Design and make a rotoscope. (Hint: consider what youknow about design & technology)
What will you do?
What did you see.
Describe why there was and wasn't an illusion of flight or motion?
Lab notes 7 - Perspective and Warped Window illusion
Materials
- Thread or string (1 meter or 40 inches), warped window, straw or pen, scissors
- Perspective illusions
Challenge
Make a warped window illusion:
Directions
- Make a tape loop.
- Use the tape loop to attach the straw through the center of the window frame with half of the straw on either side.
- Tape an end of the string to the perspective window.
- Tape the other end to the edge a table or desk, or in a door way, so that it hangs at eye level when sitting or kneeling by the table or standing by the door.
- Twist the string 30-50 times in order to get a consistent rotation speed.
- Have the viewers stand 2 ft. away from their hanging perspective warped window and close one eye.
- Focus on one end of the window and watch it rotate.
What did you observe?
Explain your observations. (Hint review the illusion fact sheet)
Lab notes 7b - Putting Perspective to work
Materials
- Paper and teacher directions or video to follow directions to make a cube with two perspective points.
Challenge
Make a cube with perspective points.
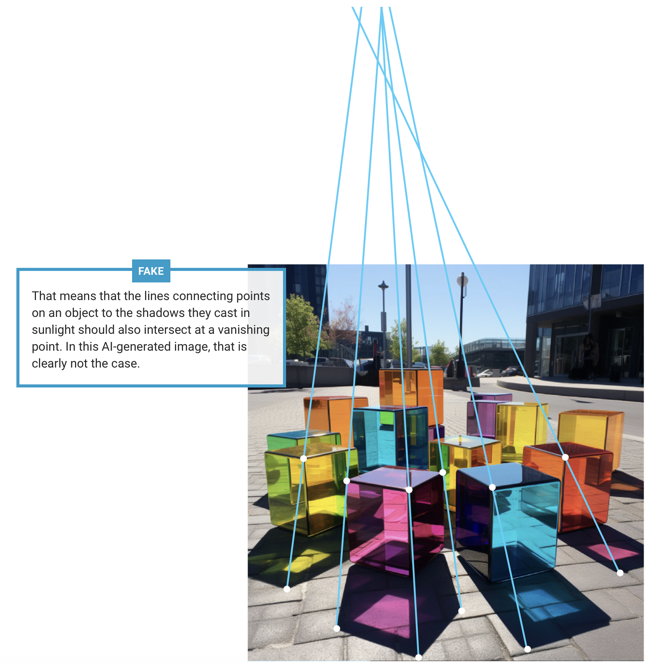
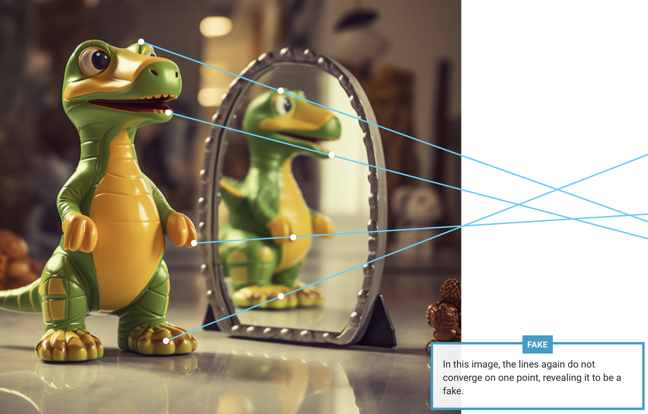
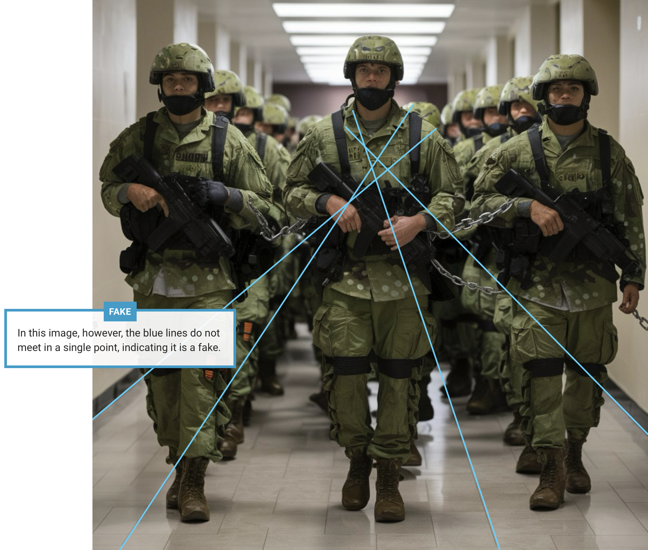
Observe the three pictures and explain your observations.
(Hint it's all about perspective)
Picture real art or AI generated modern art.
Picture alligator or AI generated alligator?
Armed men in a hall or AI generated?
Lab notes 8 - Flip book
Materials
- paper, stapler, colored pencils, markers, scissors
- Flip book page 1 & Flip book page 2
Challenge
Cut out the flip book pages, put them in order, staple along the left edge with the page number and flip.
Explain how a flip book creates an illusion of motion.
Challenge
Create a flip book that uses illusions of something you learned about illusions.
Illusion fact sheet
Facts on the function of eyes and the brain for sight, color, shadows, motion, and more.
Support materials
Stop go visual

Plane flip book
The title above and this will print on a separate sheet so the first flip book pages sheet will print on one page.

Plane flip book
Flying birds

Soaring bird

Warped window

Bird & cage pattern
Black, white, gray illusions
Count the black dots
Haze changing illusion
What size are the dots?
Perspective illusions
Is the book open face up or face down?
How tall are the people?
What size are the table tops?
Illusion fact sheet
Here is a list of ideas related to illusions I collected!
Use them as a start to create a fact sheet of your own.
- When you look at an object, you are really seeing the light that is bouncing off of it and entering your eye, which is converted into electrochemical impulses that your brain interprets as an image.
- Optical illusions make sense when you remind yourself your eyes are only the beginning of the process of what we see. Our brains are key in creating images.
- Our brain is constantly trying to protect us from threats in our world by quickly making sense of a 3D world with our 2D reporting retinas.
- When our brain interprets everything at once it takes shortcut so you can have a quick reaction time to escape dangerous situations.
- Our brains can warp straight lines if an object in the middle of them looks like it's drawing closer, because it wants to emphasize it as a potential threat.
- Different colors, and light and dark, can make same sized objects look different or make patterned images look like they're spinning.
- When you stare at something red for a long time, the cells in your eye adjust by becoming less sensitive to red light. Then when you suddenly look away from the red, your green and blue cells are more sensitive than your red cells and you end up seeing a greenish-blue spot.
- If separate objects are expected to be of the same size, the larger ones are seen as closer. (monocular)
- When you are moving, you use the speed of passing objects to estimate the distance of the objects. Nearby objects seem to go faster while distant objects seem to go much more slowly. (monocular) Motion parallax
- Distance or depth cues can be processed by either eye alone. (relative size, interposition, aerial haze, texture gradient, linear perspective, motion parallax.) Monocular depth clues or perceptual depth cues.
- The use of visual cues to perceive the distance or three-dimensional characteristics of objects. Depth perception
- Optical illusion are produced by what the eye perceives and the brain interprets from what are otherwise reliable processes
- Perceptual illusion are misperceptions of the true characteristics of an object or an image.
- Optical illusions are the continued presence of an image after it has disappeared from view. Persistence of vision or retinal persist.
Observing and understanding
- Observational data and reasoning is used to explain interactions. Evidence is something that is observed and can be used to understand what is happening and make predictions about future changes.
- The observations used to describe properties and make explanations are based on how they are observed and can be inaccurate.
- Models are structures that correspond to real objects, events, or classes of
events.
- Explanations are based on observation derived from experience or experimentation and are understandable.
Drawing with Perspective
Drawing a cube

Source youTube (7:53)
AI Generate Art - how to demonstrate it a fake
Source Science April 30, 2026
Drawing with Perspective
AI Generate Art - how to demonstrate it a fake
Source Science April 30, 2026
Drawing with Perspective
AI Generate Art - how to demonstrate it a fake
Source - Science April 30, 2026
See article for an explanation on how to use physics and Neuton's Laws of motion to tell if explosions are AI or real.
Home: Pedagogy - theory, curriculum, learning, human development, & teaching
Home: Science - knowledge base, activities, pedagogical knowledge in all dimensions