
Motion unit: Spinners: tops, zoomers, twirlers, rollers: wheels, wheels & axles, cups, & spheres ( Primary grades and above)
Contents Overview
- Introduction
- Big ideas, concepts, facts, & outcomes
- Science content concepts & outcomes
- Inquiry & science process concepts
- Pedagogical overview
- Activities sequence
- Focus questions
- Materials
- Scoring guide suggestions
- Unit activity sequence
- Activity 1 - Spinners, toy tops, & gyroscopes. Learners reflect on the unit focus questions,
- Activity 2 - Zoomers
- Activity 3 - Twirlers
- Activity 4 - Rolling Wheels and wheel and axle systems
- Activity 5 - Rolling Cups
- Activity 6 - Rolling Spheres
- Lab notes
- Lab note 1 - Spinners & toy tops
- Lab note 2 - Zoomers
- Lab note 3 - Twirlers
- Lab note 4 - Rolling wheels
- Lab note 5 - Rolling cups
- Lab note 6 - Rolling spheres
- Material sheets & patterns
- References
Introduction
A sequence of plans to facilitate a review and develop a deeper understanding of when objects or systems rotate (move in a circle around a central axis) or have rotational motion. If a force is applied to the system, it can be put in motion. A push from one side can easily move the whole system to a new location, called linear motion.
The outside of a wheel is a circle. A circle is the shortest line around a given area. A circle can be both stable and unstable depending on what is used to balance it.
Activities in this unit include investigations into claims of what makes objects rotate: spin and roll and the variables that affect their motion. Activities with spinners, tops, gyroscopes, zoomers, twirlers, rolling
wheels, wheel and axle systems, and rolling cups.
Background information:
This plan is designed for learners who have very little prior knowledge of rotational motion. However, they probably should have some conservation skills, such as believing variables that affect rotational systems will do so consistently, or is conserved (always be).
Related study topics:
- Balance - stable and unstable objects,
- Motion, ramps, rolling spheres, and forces
- This unit: Motion: Spinners: tops, zoomers, twirlers, rollers: wheels, wheels & axles, & cups
- Relative position and motion
Other toys that spin or rotate: fidget spinners, hula hoops, ...
Big ideas, concepts, facts, and outcomes
Big ideas
- Objects can be explored to make claims about their rotational motion and the variables the affect how their motion changes, is constant, and how to measure it. Equilibrium is a state where the net forces is zero.
Related concepts and facts
- Better decisions (claims) are made when information is verified, with evidence and reasoning, before being considered accurate and used to reason and develop explanations and models to understand the world and make decisions.
- People make better decision when they understand and consider the positive and negative influences that effect their decision making.
Outcome
Use accurate verifiable information to consider and decide how objects can be balanced or made more stable.
Science concepts: physical, earth, life
Big ideas: The amount, position, and location of mass affects how an object or system rotates and rolls. Equilibrium is a state where the net forces is zero.
Related concepts
- Motion is a change in position over time.
- A force (push or pull) causes motion.
- A bigger push or pull makes objects move faster (speed up) or slow down more quickly.
- Motion can be linear and rotational.
- Spinners
- Objects and systems that go around exhibit rotational motion.
- Spinning is rotational motion.
- There are different kinds of rotational motion.
- The amount and position of mass affects how an object or system rotates.
- There are different ways to initiate rotational motion in objects and systems.
- Rollers
- Wheels, disks, and spheres roll down hill.
- Axles support wheels.
- Wheel-and-axle systems with wheels or different sizes roll toward the smaller wheel.
- The amount and location of mass affects how objects and systems roll.
- An object is stable or balanced when it is not moving relative to its base position.
Outcome
- Spin and roll different objects.
- Explain (claim with evidence & reasoning) an object's rotational motion and how it changes. More force causes faster and longer spinning. The direction of a force will affect the duration of spin and the stability of a spinning and rolling system (spinner, top, gyroscope, zoomer, twirler, wheels ... )
- Explain forces are in equilibrium when an object is not moving.
- Forces can move objects from equilibrium.
Science inquiry, process, & perspective concepts, facts, & outcomes
Big ideas: Science (claim evidence & reasoning) can be used to understand and explain cause and effect in the world.
Related concepts and facts
- Variables describe properties that change and can be used to explain interactions.
- Relative position describes changes in positions of objects when they are moved relative to a common position.
- Systems are used to describe objects that interact together.
- Interactions can be explained by describing how variables change within a system and how a system interacts with other objects or systems.
- Objects change.
- Change can be observed and recorded as before, during, after.
- Change is observed through properties of the object.
- Change can vary.
- Constancy Somethings stay the same and some things change.
- Constancy can sometimes be observed during a very slow rate of a change process or focusing on a particular property.
- When I experiment I collect observations that describe how different properties change (become variables) when objects and systems interact. This helps me make claims, explain what is happening, and to predict what might happen in the future.
- Inquiry concepts
- Process concepts
- Perspective concepts
Outcome
- Describe how the properties of rotation changes and is sometimes constant or in equilibrium.
- Describe how changes can be observed and measured.
- Describe how a claim is made and evidence used to reason and explain how the rotation changes relative to the forces. Claims are made from observations and used to create and verify explanations.
Pedagogical Overview
Activities Sequence to provide sufficient opportunities for students to achieve the targeted outcomes.
Make sure students have the prior knowledge identified in the background information.
Spinners
- Activity 1 - Spinners, toy tops, & gyroscopes. Learners reflect on the unit focus questions,
- Activity 2 - Zoomers
- Activity 3 - Twirlers
Rollers
- Activity 4 - Rolling Wheels and wheel and axle systems
- Activity 5 - Rolling Cups
- Activity 6 - Rolling Spheres
Focus question
Unit focus question:
What is rotational motion, how is it different than linear motion, and what variables affect different kinds of rotational motion?
Sub focus questions:
- What is rotational motion? motion in a circle around a central axis
- How is rotational motion different than linear motion? Multiple forces interact to curve straight line motion.
- How is the motion made? Force - push or pull
- What makes it? Force - push or pull
- What slows it down? Force - friction rubbing, scraping, gravity,
- What does it mean to change? to move from one place to another, transform shape, color, ...
- Is there a rule about how different objects rotate? they move in a circle around a central axis
- How is rotational motion different than linear motion? circle and line
- Is curved motion rotational? some is and some isn't. Depends on a consistent force applied for a long enough period of time to make a rotation
- How can claims people make be verified or rejected? experiment and observation
Materials
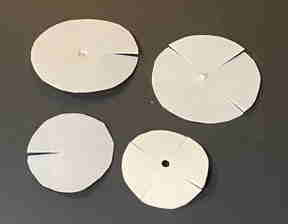
- Tops, plastic disks, (Use plastic lids from plastic containers Examples: ice cream lids, yogurt lids, coffee can lids) to make spinners.
- Plastic straws (1/4 inch x 3 inches works very well for tops) or dowel rods or Knex rods
- Paper clips, scissors, paper, crayons or markers,
- Construction sheets - Spinning Designs see lab note 1
- Lab note 1 - Spinners & toy tops
- Lab note 2 - Zoomers
- Lab note 3 - Twirlers
- Lab note 4 - Rolling wheels
- Lab note 5 - Rolling cups
- Lab note 6 - Rolling spheres
References and other resources
Scoring guides suggestions (rubric)
Rotational motion (scoring guide)
Top level
- Explains rotational motion is motion in a circle around a central axis caused by interacting forces that act on an object in different directions that result in curved or rotational motion. Objects with rotational motion or spins consistently for a period of time has the forces balanced in a way for the motion to be smooth and longer lasting.
- Rotational motion is circular when forces push a spinning object.
- Explains rotational motion is motion in circles or spinning motion.
Lower level
Lesson Plans
Activity 1 - Spinners & toy tops
Materials
Each learner
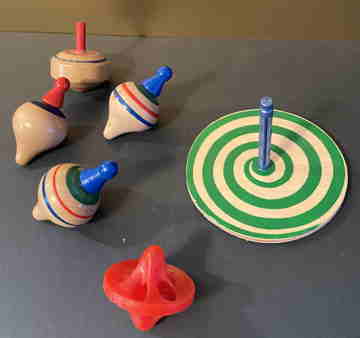
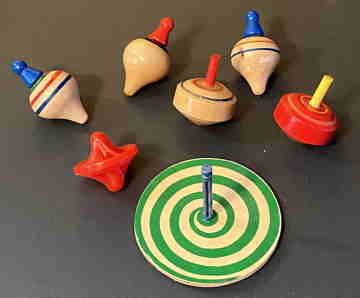
- Assorted tops
- Lab note - Tops & spinners
- 4 - plastic wheels with center holes (Use plastic lids from plastic containers like: ice cream lids, yogurt lids, coffee can lids)
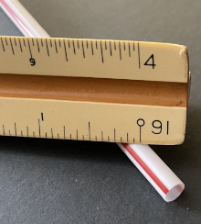
- 2 large 8 1/2 cm or 3 1/4" diameter
- 2 small 5 1/2 cm or 2 1/4" diameter
- Plastic straws (1/4 inch x 3 inches works very well for tops) or dowel rods which can be rounded with a pencil sharpener, or Knex rods
- Crayons or markers,
For the class: extra straws, transparent tape
Focus questions:
- What is a top?
- Why do some tops spin longer than others?
Learning outcomes:
- Explore and spin tops.
- Describe how rotational motion changes and how it is sometimes in a constant or stable motion.
- Describe variables that change motion.
- Describe cause and effect of different variables (spin, force, direction of force, shape of top, mass of top, material of top, ...).
Suggested procedures overview:
- Put learners in groups, focus their attention, and assess their initial understanding of the focus questions.
- Give learners tops and challenge them to spin them.
- Have each group share how they spin them.
- Ask learners. If they could make a top?
- Pass out materials and have learners make a top, spin it, and discover what variables affect the spin.
- Conclude what variables affect the spin of tops.
Exploration -
- Put learners in pairs.
- Ask. What is a top?
- Introduce the tops. (If you have an assortment of tops, then let them explore and discuss how they operate before continuing to have them build disk tops.
- Tell. Today they are going to build tops and study their motion.
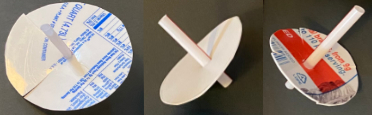
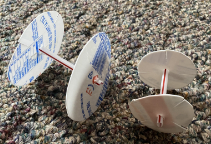
- Describe and model how to make a spinner (top).
- Show the students how to slide the straw through the disks by inserting the straws through the center hole on the disk.
- Tell them that they may add designs to the top.
- They can create their own design or use ones on the Lab notes - Tops & spinners.
- May draw directly on the disks or tape a design on top of a disk to hold it in place.
- Spin the tops.
- Suggest they can slide a few disks of the same and different sizes on the straw and see how that affects the spinning.
- Try different designs and watch the designs to see how they change.
- Give the students time to explore with the tops. While the students explore visit each group and provide encouragement and observe the different tops and how they are spinning.
- After an appropriate amount of time call the class together and ask:
- Did you make a top?
- What did you use to make your top?
- How do you know when you have made a top?
- How do you know it is moving? observation and measurement (it moves like this or from here to here)
- What part of the tops move?
- What does the straw do?
- How does a top move when it is working?
- What kind of motion does a top make when it is going?
Invention -
- Explain and discuss with the learners that when something turns in circles or goes around and around we call it spinning or rotating. The tops rotate when they are working.
- Discuss top motion to conclude cause and effect of different variables (spin, force, direction of force, shape of top, mass of top, material of top, ...
- What is the best design for a top that spins a long time? Many disks on a shorter straw.
- What is the best design for a top that spins fast? Many smaller disks.
- How does adding disks help? Add weight or mass to increase inertia.
- How does having the disks high or low on the straw affect how it spins? Low gives it a lower point of balance, center of gravity or mass. See Balance & stability.
- How many ways are there to spin a top? (Between thumb and first finger and between two palms)
- Where in the world are there objects that spin? How do people have to design them so they can spin real well?
- To add colorful designs to the tops cut out a design on the Spinning Designs sheet and color them. Poke a hole in the center of the design with a pencil. Slide the design on the top. Use tape or a small disk to hold the design in place.
- Demonstrate using a paper clip to hold the top upright for slow rotation.
- Give the students some time to design their own tops and observe them.
- After students are done exploring their own design on their tops collect all the materials and return them.
- Discuss with the students about the top designs that make interesting color when they spin.
- Why do colors change?
- How were you like scientists today?
- How may you use what you learned today?
Exploration
Fancy spinners or tops

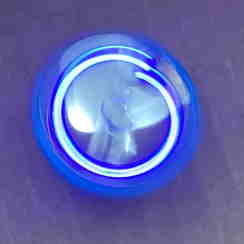
Find a top that lights up when spinning to explore.
The image on the right is a small top with a light bulb. The bulb will only light if the top is spinning at a certain rate or faster. It would be interesting to have learners spin it and discover that it will light.
After observing it light, challenge them to describe a model and explain how it might be engineered or made. The system includes two interacting subsystems: an electric circuit that lights the bulb and a switching mechanism that opens and closes the circuit.
It is possible the electrical circuit includes conductors connected with a mechanism of hinges or swivels so that without spinning (stable condition) the circuit is open. When spinning the force (momentum) pulls or pushes the mechanism so the switch moves and closes the circuit and the light bulb lights. When the spinning rate, or momentum force, decreases, then the force on the spring or tension in the mechanism relaxes and the system returns to its stable state and the circuit opens.
The following pictures show the top spinning: one in the light of day and the other in a darkened room.

Gyroscopes
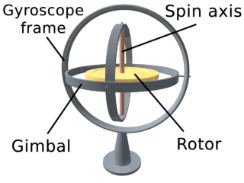
Demonstrate a gyroscope and compare it to tops and spinners.
Ask. How are they similar and different? It is like a top plus an additional axis. A system with two subsystems that interact. The top system spins with a perpendicular orientation and the outer gyroscope frame changes orientation depending on the external forces.
Encourage additional exploration of their uses: Gyroscopes are used with compasses, automatic pilots on ships and aircraft, steering mechanisms of torpedoes, guidance systems in rockets, space vehicles, missiles, and orbiting satellites. Source

Activity 2 - Zoomers
 Materials:
Each learner
- lab note 2 with zoomer construction sheet
- 1 large plastic disk. 8 1/2 cm or 3 1/4" diameter
- 1 string 100 – 115 cm
Focus questions:
- What is a zoomer?
Learning outcomes:
- Explore and operate zoomers.
- Describe variables that change their motion.
- Describe cause and effect of different variables (spin, force, direction of force, shape of zoomer, mass of zoomer, material of zoomer, kind of string, ...).
Suggested procedures overview:
- Put students in groups, focus their attention, and assess their initial understanding of the focus questions.
- Activity twirl zoomers.
- Describe their motions and forces.
- Make and verify claims that cause their motion.
Exploration
- Put students in pairs.
- Ask focus question. Did anyone ever hear of zoomers?
- Tell. They are kind of like tops and you are going to make one.
- Distribute lab note 2.
- Have learners look at the Zoomer construction sheet and ask if they have questions on how to make and operate a zoomer.
- If they do, answer them and then tell them to make their zoomer.
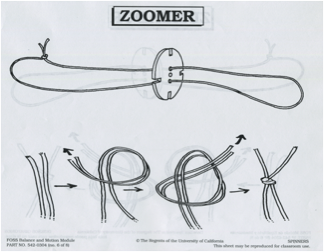
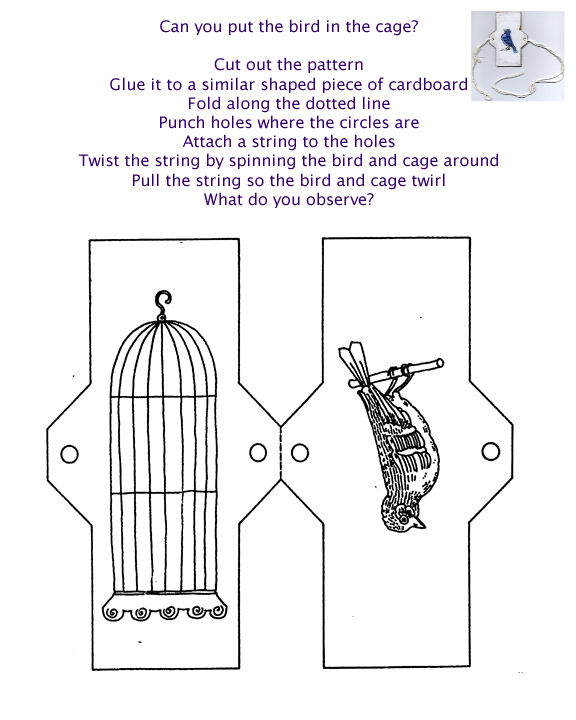
- Thread one end of the string through one of the outside holes in a large disk and back through the hole on the outside hole on the other side.
- Tie the two ends of the string together.
- To operate the zoomers
- Stick your thumbs through the loops formed by the end of the string.
- Whirl the large disk around between your hands 15 or 20 times to twist the string.
- Pull the string tight to start the disk spinning.
- Release tension so that the string, can wind up as much as possible in the opposite direction.
- Apply tension again to make the disk rotate rapidly in the other direction again.
- Continue pulling and releasing to get the disk rotating rapidly.
- Listen for the zoom.
- Give the learners time to assemble the zoomers and explore them.
Invention
- Recall and review the motion and forces for tops.
- Ask. What kind of motion did the tops make? rotational and curved linear
- How do you know it is moving? Observation of how it changes from start to finish.
- What forces caused motion? Twist of hand, gravity, friction of surface
- What part of the zoomer system moves? The disk, the string, hands
- What does the string do? Twists and pulls and pushes the disk or zoomer and winds up and unwinds.
- How does a zoomer move when it is working? Rotates clockwise and counter clockwise.
- What kind of motion does a zoomer make when it is going? Rotational about an axis located in the center between the two holes.
- Compare the tops motion - spin and rotation to the zoomers.
- Ask. What other objects spin?
- How do people design them so they spin real well?
- How were you like scientists today? Made claims, collected evidence and reasoned with it to verify or exclude the claims.
- How may you use what you learned today? Explore by trying things and see how they work.
Discover
- Color disks with different colors and designs and observe how they operate when zoomed.
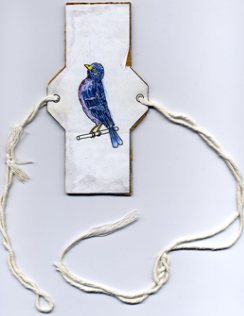
- Make the zoomer bird and cage zoomer: Pattern with directions
- Make zoomers that make sounds.
- Explore toys with similar properties.
Activity 3 - Twirlers
Materials:
For each student
- Lab notes - twirlers
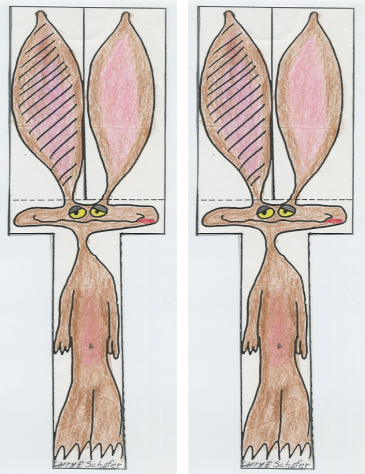
- Coyote twirler pattern or other paper twirlers
- Scissors
- Paper clips
- Tape
Focus questions:
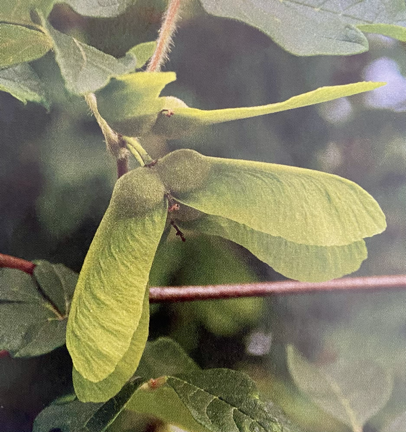
- What kinds of objects spin when they fall through the air? tree seeds, like maple and ash seeds
Learning outcomes:
- Twirl a twirler.
- Explain twirlers fall with the force of gravity and as the air flows past the twirler blades it causes they to rotate according to the shape and position of the blades.
Suggested procedures overview:
- Put students in groups, focus their attention, and assess their initial understanding of the focus questions.
- Activity release twirlers so they will spin as they fall to the ground.
- Describe their motions and forces and make and verify claims that cause them.
Exploration

- Put learners in pairs.
- Distribute Coyote twirler lab notes with pattern.
- Plan for two sessions of 30-40 minutes for the class.
- Review the spinning motions of the tops and zoomers from the previous activities.
- Ask. What caused the tops and zoomers to spin or rotate? The force from a hand when they twist the tops or when they twisted the string and pulled the zoomer string to rotate the disk.
- Ask. Can you make a spinner that will rotate by itself?
- Display a coyote twirler.
- Distribute the lab note page with two coyote twirlers.
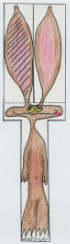
- Ask. How to make ONE twirly coyote. Cut on the solid lines and fold on dashed lines. One ear forward and the other backward.
- Ask. How to twirl them. Drop the twirler. Drop from as high as possible.
- Use the second pattern to make a different coyote twirler. Make the ears longer or shorter. Add a paper clip.
- Experiment with different sizes of ears, different angles or ear folds, and adding paper clips.
Invention
- What find of folds did you have to make to get your twirler to spin?
- Ask. What kind of wings makes the twirler spin faster?
- What kind of wings makes the twirler spin slowly?
- What kind of wings makes the twirler fall slowly?
- How did you change your twirler to make it better?
- Make three tables:
- Length of ears: short, medium, long
- Slope of ear fold: less than 90 degrees, 90 degrees, more than 90 degrees.
- Number of paper clips: zero, one, two
- Add data for each variable and how each of the three differences changed the motion.
- Discuss and write a relationship for each variable. Longer ears .... Folds of ... degree spin ... More paper clips cause ...
Discovery
- Discuss how tops, zoomers, and twirlers are all the same. They all rotate.
- What is similar about the tops, zoomers, and twirlers?
- What kind of motion is taking place in all three? rotational and straight (linear)
- How is this same motion achieved in the tops, zoomers, and twirlers?
- Ask. How are they different. The way the person starts the objects motion is different. The force is added in different directions and with different amounts.
- Ask. What other kinds of things rotate and spin?
- How were you like scientists today? Asked questions, conducted experiments, used observation to make claims and answer questions.
- How may you use what you learned today?
Activity 4 - Rolling wheels
Materials
Each student
- Lab notes - rolling wheels
- Large plastic disks (Use plastic lids from plastic containers Examples: yogurt lids, coffee can lids, ... ) 8 1/2 cm or 3 1/4" diameter
- Small plastic disks. 5 1/2 cm or 2 1/4" diameter
- Straw 1/4 " diameter works well.
- Cardboard ramp 8" - 12" x 12" - 18"
- 4 clothespins
For the class: additional straws, tape, and wheels and axles from different toys

Focus questions:
- What kind of motion do wheels, double wheels, and wheels and axles have? they roll
Learning outcomes:
- Learners roll and observe wheels, disks, and wheel and axle systems.
- Explain how wheels and wheel and axles roll and the forces that affect them
Suggested procedures overview:
- Put students in groups, focus their attention, and assess their initial understanding of the focus questions.
- Activity roll wheels down inclines and observe their motion.
- Describe their motions and forces.
- Make and verify claims that explain the causes of the motion of wheels, double wheels & wheel and axle.
Exploration
- Ask. What type of motion did they experience with the spinners and tops? rotational and wobbling along a straight or curved path
- Ask. How do you know when something is spinning. Goes around fast, rotates, spins, turns,
- Organize learners into pairs or groups of four. Learners can work in pairs if within a group of four.
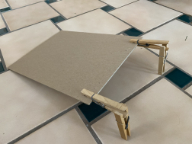
- Have each group set up a cardboard ramp.
- Clip two clothespins on one end of the cardboard.
- Clip a second clothespin on each of the first two clothespins to make legs.
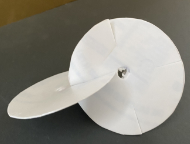
- Hold up the large disks. Explain that they are like wheels.
- Explain that they will have to share the ramp, but they will each have their own wheel.
- Provide one wheel or plastic disk to each learner.
- Allow time for the students to explore the wheels on the ramps. Ask them what they found out. Wheels slide and roll.
Invention
- Ask. How they can make their wheels roll better. If there is no answer, pass out lab notes 4 and tell them to look at the pictures and ask again. Use two or a wheel and axle.
- Distribute the Lab note 4
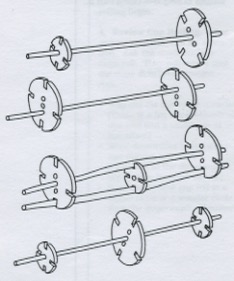
- Tell learners they are to explore a wheel, double wheels, and wheels and axles and discover how they roll down the ramp.
- After they have explored the three different systems have them share the systems they have created and what they discovered about how each interacts with the ramp.
- Bring the whole class together and have them share their observations for each system.
- Single wheel roll straight to curvy
- Double wheels wobble down slope
- Wheel & axle mostly straight or slight curve
- Discuss why each system made the type of motion it did. The wheel rolled down the incline (slope) but the wheel was so narrow it tilted to the side and rolled along a curved path. The wheel and axle system held the wheels so they didn't tilt and rolled straighter. The double wheels didn't roll, but as they slid down the incline they wobbled from side to side.
- How is this motion similar to tops, zoomers, and spinners? They rotate depending on the amount of force. It seems as the force weakens or is different than the direction of rotation, then the system also wobbles or moves in a line (curved or straight or both).
- How are the motions different? Wheels and wheels and axle tend to move in the same direction. The double wheel system moves back and forth or changes directions.
- What other objects have you seen that can roll besides wheels?
- How were you like scientists today?
- How may you use what you learned today?
Discover
- Give learners time to extend their ideas by allowing them to make new and interesting wheel and axle combinations.
- Learners can explore wheels and axles from toys or in media.
- How are goods moved through a manufacturing plant?
Activity 5 - Rolling cups
Materials:
Each student
- Lab notes - rolling cups
- 1 large paper cup (150 ml),
- 1 small paper cup (90 ml)
Each pair of students:
- 1 cardboard ramp (8-12" x 12 - 18"),
- 4 clothespins,
- 2-5 pennies
Class:
Roll of tape

Focus questions:
- How can cups be made to rotate?
- Is a rolling cup rotating?
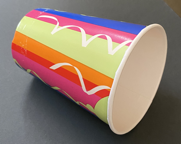
- How do cups roll down an incline?
- How do you get cups to roll down an incline straight?
- What determines how cups roll down an incline?
Learning outcomes:
- Explain that cups will rotate (roll) down an incline plane and how they roll depends on the size of each end of a cup: ends of equal size will make one rotation in equal time. A smaller end will rotate faster than a larger end. A smaller travels less than the larger end.
Suggested procedures overview:
- Put students in groups, focus their attention, and assess their initial understanding of the focus questions.
- Activity release roll cups down inclines.
- Describe their motions and forces.
- Make and verify claims that cause curved and straight paths.
Exploration
- Organize learners into pairs and groups.
- Hand out the materials that are needed.
- Ask. What kinds of motion do wheels make. Wheels roll when they are in motion.
- Show the learners the cups and ask. How are they like wheels? They are round. They will kind of roll.
- Say. You are going to investigate how cups roll.
- Let them explore rolling the cups for 4-8 minutes.
Invention
- When time is up, ask. How do the cups roll? They roll in a curved path. They do not roll straight.
- Why do the cups roll in a curved path or circle? The smaller end rotates faster than the larger end. A smaller travels less than the larger end.
 What determines which direction the cup will roll? the size of the ends on the cup. Smaller ends travel in smaller circles, Larger ends travel in larger circles. Larger ends have more force and push toward the smaller ends. If the small end is on the left the cup will curve to the left.
- Does the smaller cup roll in a bigger circle or a smaller circle than the larger cup? smaller smaller ...
- Ask. Can you think of a challenge or problem to solve?
- Possible challenges:
- Park-the-Car Problem. Pretend that your cup is a car and the parking garage is underneath the ramp. Make the cup roll down the ramp and end up parked under the ramp. When successful, drive the car in from the other side. Then can it drive in from the back of the ramp?
- Fall-on-Your-Face Problem. Roll the small cup across the ramp in such a way that it ends up face down on the table. It can be done.
- Straight-Cup-Rolling Problem.
- Straight cup rolling problem with two different sized cups. Hint: use tape & pennies
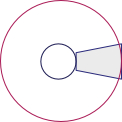
- Make an outline of a cup and draw the circular path for each end of the cup.
- Optional - Brain buster: How does the size of a path compare to the size of cup?
- Have learners explore a challenge and collect information to work toward a solution.
- Come together to show and tell what they have discovered.
Discover
- If some learners explored with adding weight (pennies) to the cups, review what they learned and ask. How can we explore how pennies change the motion of cups. Pennies can be taped on the inside side and inside bottom. They can be equally spaced or off set.
- Let them explore with different placements of pennies and how they change the motion.
- Have learners participate in a show-and-tell of what they discovered about how the pennies affected how the cups rolled.
- Does adding pennies change the direction a cup rolls from when it does not have pennies?
- Make diagrams that show how a cup rolls without pennies (control) and with pennies (experimental) to compare.
- Ask. How did adding pennies change the way the rolls?
- What kind of strategies did you use to discover a pattern?
- What effect did the pennies have on the cup?
- What happens when you added more weight to the cup?
- How were you like scientists today?
- How may you use what you learned today?
Activity 6 - Rolling spheres
Materials
- Lab notes - rolling spheres
- Each pair of students: 2 marbles, 2 plastic cups, 2 lids for plastic cups, 1 runway (plastic foam)
For the class: masking tape
Focus questions:
- How do spheres move?
Learning outcomes:
- Describe spheres will roll in a straight line unless they are pushed by an external force (wall of cup, floor, slope, hitting an object).
Exploration
- Organize learners into groups and pairs.
- Hand out materials.
- Review the rolling motions of the wheels and cups.
- What type of motion did the wheels and cups make?
- Say. Today you will investigate a sphere. A sphere is round in every direction, like a ball.
- Spheres will roll. so to keep track of them, by keeping them in a cup when they are not being used for an experiment.
- Investigate how a marbles spins in a cup with a lid.
- Show them a plastic-foam runway.
- Challenge: Discover how marbles roll in the runways.
- Suggest runways can be extended by taping two or more together.
- Ask. How different groups might work in teams and combine their runways?
- Have them plan how to make their marble move in their runway.
- Ask. How will you keep the marble from escaping the runway?
- After they have explored this idea, ask groups their plans to explore spheres and a runway.
- Tell them to try their plan and be ready to demonstrate to the class their runways.
- Allow students to construct their project with little assistance. However, monitor their exploration and assist with possible, I wonder if ..., suggestions.
Invention
- Regroup as a class and groups demonstrate their projects.
- Ask. How did the marble roll in the runways?
- Discuss the motion of spheres through the runways.
- Is there rotational motion? yes
- Describe it. As the sphere rolls it is rotating around an axis parallel to the ramp.
- What causes the forward motion? The sphere interacting with the runway.
- For every change in direction ask what force caused the sphere to change directions. A push from the runway.
- How could you change the speed of the marble on the runways? higher slope
- What variables effected how the marble rolled on the runway? slope of runway, size of marble, texture of materials (smooth marble, ),
- What is similar about rolling the wheels, cups, and marbles?
- What is different about rolling these objects?
- How do these objects move?
- What changes the motion of the objects?
- How were you like scientists today?
- How may you use what you learned today?
Discover
- Propose making a single line marble run using the entire runway.
- Have a discussion similar to that in the invention above about what they learned about rolling marbles in the combined runway.
- Additional sphere activities See rolling spheres.
Lab Notes for activities
Lab notes 1 - Spinners & toy tops
Materials
- Assorted tops to explore
- Plastic disks
- Straws
- Pencils, crayons, or markers
Designs
Describe what you do.
Lab notes 2 - Zoomers
Materials
- String, plastic disk with holes.
Challenge
Make a zoomer.
Describe what you do.
Lab notes 3 - Coyote twirler
 Materials
- Coyote twirler pattern
- Scissors, paper clips,
Describe what you do and what happens.
After sharing with the class summarize how different variables changed the motion.
Describe how each variable changes the motion.
Length of ears:
- Short
- Medium
- Long
Slope of ear fold:
- Less than 90 degrees
- 90 degrees
- More than 90 degrees.
Number of paper clips:
- Zero
- One
- Two
Lab notes 4 - Rolling wheels
Materials
Focus questions:
- How does a wheel roll?
- How do two wheels roll?
Challenge
Roll some single wheels, double wheels, and wheels with an axle. Describe how they roll down an incline (ramp).
Single wheel
Double wheels
Wheel & axle
Material Sheets
Bird & cage twirler pattern
Coyote Twirlers
Cut on solid lines and fold along dotted. One ear forward and another backward.
Maple seed Twirlers - samaras
Circles for wheel patterns
