Color & Dyes
Unit with dye activities & history & nature of science
Questioning is the foundation of all learning.
The first step in rejecting not knowing is to ask, why?
Sweetland
Introduction
- Introduction
- Big ideas, concepts, facts, & outcomes
- Science content concepts & outcomes
- Inquiry & science process concepts
- Anticipated learnings & misconceptions
- Pedagogical overview
- Activities sequence
- Focus questions
- Materials
- Scoring guide suggestions
- Unit activity sequence
- Activities
- Activity 1 - Indoor Rainbow
- Activity 2 - Milk Rainbow
- Activity 3 - Rainbow in a Bag
- Activity 4 - Colors from Plants
- Activity 5 - Exploring Plants-Plant Dyes
- Activity 6 - Tie dye
- Activity 7 - Create an activity to add color to ...
- Activity 1 - Indoor Rainbow
- Lab notes
- Lab note 1 - Indoor Rainbow
- Lab note 2 - Milk Rainbow
- Lab note 3 - Rainbow in a Bag
- Lab note 4 - Colors from Plants
- Lab note 5 - Exploring Plants-Plant Dyes
- Lab note 6 - Tie dye
- Lab note 7 - Create an activity to add color to ...
- Support materials
A unit comprising a sequence of activities to deepen one's understanding that science has been used for thousands of years and has changed the ways people think about occurrences in nature.
That science is an ongoing human endeavor. Many people throughout history have made contributions to science through learning about objects, events, and phenomena in nature. One of these contributions is extracting dyes from earth materials and plants.
To gain knowledge of this process, learners will use scientific methods as they carry out controlled and trail-and-error experiments. As a result of their dying experiments they will make connections with the History and Nature of Science.
Background resources:
This plan is designed for learners who have very little prior knowledge of However, the unit encompasses sufficient activities and information to provide comprehensive content for more learners.
Related study topics:
Planning information
Learner background information
A plan designed for learners who have prior knowledge in cause and effect, use of observations to make inferences, models as explanations for observable and non observable events, and working in groups.
Intended learnings & learners thinkings
See for more information on what to include in general planning
Content concepts or outcomes
(Source concepts & misconceptions)
Big ideas and specific outcomes:
- How do humans create colors?
- What is a dye and how do they work?
- How has the History and Nature of Science affected generations of people?
- How do people and scientists make discoveries?
Concepts and facts
- Humans generally use trial and error to to observe and discover and they share their discoveries to benefit their families and communities for survival and artistic benefits.
Outcome
Describe how knowledge can be discovered and passed on from generation to generation.
Science concepts: physical, earth, life
Big ideas:
Humans have used earth and plant materials to color their clothes, tools, and art. While early humans have left evidence of their use of ocher and bitumen 67,800 YA, their use of plant materials and clothes have not been preserved. Source However, the cultural knowledge of dying materials has been passed on through generations and changed as people develop new sources of materials to use as dyes.
Related concepts
- A dye is a coloring matter that are typically soluble or dispersible in a liquid medium (usually water) and bind to materials via chemical or physical bonds.
- They are generally organic compounds that adhere to the substrate to which they are applied, such as textiles, paper, or leather.
- Dyes can come from earth materials, plants, and plant parts.
- Colors of the rainbow can be produced from objects that are in nature.
- Pigments are insoluble, finely ground colored particles (organic or inorganic) used to impart color, opacity, and functional properties to materials like paint, plastics, and inks. Unlike dyes, they do not dissolve in the binder but remain suspended.
- A model for dissolving explains it as a behavior of a solute being changed into microscopic particles (atoms, molecules, or ions) and dispersed through the solvent to make a solution.
Outcome
- Describe how dyes are a solute that can be dissolved in a solvent to make a solution that will adhere to another substance and change its color.
- Color is a property of the material that light reflects from to be observed through a human eye.
Anticipated learner thinkings & misconceptions
Color
- White light is pure and colorless light.
- Color is a property of something other than a property of light.
- Sunlight is red, yellow, or orange
- Light travels from our eyes so we can see.
- White light is only one color.
- Sunlight is different than other light.
- A rainbow adds color to sunlight.
- The color changes for mixing light and paint are the same.
- Primary colors are red blue green or red blue yellow; but not both.
- Printed colors are made with the same shade of color as in the print.
- All people see the same color for each object.
- Light eminates from the object being looked at (not a property of what light is reflected or absorbed).
- A prism or colored filter (piece of gel or plastic) puts color into light when it passes through it.
- Color in soap bubbles and rainbows are the same colors.
Rainbow
- Mist, moisture in air causes rainbows
- Water falls through light. The water has color in it and when it hits the light you see it.
- When light hits falling rain it makes all the colors in the raindrops to reflect off one another and the colors that are the same come together.
Matter properties
- Color, texture, and other properties are not relative to the matter. They are different things. Color is like paint, not a property of the matter itself.
Inquiry, process, & cross cutting concepts & skills
Inquiry
- When I experiment I collect observations that describe how different properties change (become variables) when objects and systems interact. This helps me make claims, explain what is happening, and to predict what might happen in the future.
- Inquiry concepts
- Process concepts
- Perspective concepts
cross cutting
Big ideas: See also Concepts & misconceptions
Exploring and Experimenting helps us to learn about nature and how to create tools and everyday objects to survive and enjoy life.
- How has the History and Nature of Science affected generations of people?
How do people and scientists make discoveries? - Evidence can be collected to help understand that dyes can come from plants
- How do humans create colors?
- Observations can be used to recreate interactions by employing explanations or models grounded in evidence.
Related concepts and facts
- Observational data and reasoning is used to explain interactions. Evidence is something that
is observed and can be used to understand what is happening and make predictions
about future changes.
- Models are structures that correspond to real objects, events, or classes of events. They can be mental constructs to explain interactions, or drawings that explain interactions.
- Explanations are based on observation derived from experience or experimentation and are understandable.
- Pictures or symbols represent objects.
Outcome -
- Create interactions with dyes, and use observational evidence along with logical explains to describe how the color in a solute is dissolved in a solvent to make a solution that can be used to adhere to a matrial to dye it another color.
Specific outcomes -
See process of science in Concepts & misconceptions
History of science and development of technology - perspective of science
See also Concepts & misconceptions also science, math, technology timeline
- People have practiced science and technology for a long time.
- Science develops over time.
- In a historical perspective, science has been practiced by different individuals in different cultures. Prehistoric people learned about their environment and survived before formal science, is best described as empirical observation, traditional ecological knowledge (TEK), or adaptive, trial-and-error learning. This process involved hands-on exploration and the passing down of survival information over generations. Information derived from:
- Trial-and-Error Survival: Prehistoric humans, particularly during the Paleolithic Age, used trial and error to learn which foods were safe, plants for medicinal purposes, how to hunt, and how to create fire.
- Empirical Observation: They constantly observed their environment—tracking animal migration patterns, recognizingseasons, seasonal plant life cycles,weather patterns, tides, sun, moon, and star patterns, and identifying useful raw materials like wood, plants, stone and bone for tools.
- Cultural Transmission: Survival knowledge was communicated and refined within groups, passing from generation to generation through oral tradition and behavioral observation.
- Adaptation & Technology: They created essential technology, including stone tools and clothes, to adapt to, rather than just endure, their surroundings.
Scoring guides suggestions (rubric)
(scoring guide)
Top level
- Create interactions with dyes, and use observational evidence along with logical explains to describe how the color in a solute is dissolved in a solvent to make a solution that can be used to adhere to a matrial to dye it another color.
- The material is mixed with water and dissolves into small particles that stick to the substance being dyed.
- Dye is something that smears or sticks to a material.
Lower level
Strategies to achieve educational learnings
Based on learning cycle theory & method
Instructional Procedure
Pedagogical Overview
Activities Sequence to provide sufficient opportunities for learners to achieve the targeted outcomes.
Make sure learners have the prior knowledge identified in the background information.
- Activity 1 - Indoor Rainbow
- Activity 2 - Milk Rainbow
- Activity 3 - Rainbow in a Bag
- Activity 4 - Colors from Plants
- Activity 5 - Exploring Plants-Plant Dyes
- Activity 6 - Tie die
- Activity 7 - Create an activity to add color to ...
Focus question
Unit focus question:
- How has the History and Nature of Science affected generations of people?
- How do people and scientists make discoveries?
- How do humans create colors?
Sub focus questions:
- What is ?
- How does it work?
Materials
- Lab note 1 - Indoor Rainbow
- Lab note 2 - Milk Rainbow
- Lab note 3 - Rainbow in a Bag
- Lab note 4 - Colors from Plants
- Lab note 5 - Exploring Plants-Plant Dyes
- Lab note 6 - Tie die
- Lab note 7 - Create an activity to add color to ...
Resources
Lesson Plans
Activity 1 - Indoor Rainbow
Materials
- Wide-mouthed, smooth, circular glass jar or large plain drinking glass filled with water, small mirror, flashlight, dark room with white walls or a white board
- Lab note
Focus questions:
- Can you make a rainbow with these three objects?
Learning outcomes:
- Make a rainbow and explain that the white light must have colors in it or can be turned into colors.
Suggested procedures overview:
- Put learners in groups, focus their attention, and assess their initial understanding of the focus questions.
- Activity - Make a rainbow and explain that the white light must have colors in it or can be turned into colors.
Exploration -
- Organize learners into pair groups.
- Ask. What causes a rainbow? accept all answers
- Give students all three objects and ask them how they can create a rainbow all three objects. -The glass, mirror and flashlight.
- Allow the learners
to explore and try to figure it out on their own. As they do you can provide the following hints before they loose focus.
- Submerge part of the mirror or the entire mirror in the glass filled with water.
- Shine the flashlight on the mirror above the water, below the water, or above and below the water.
- Change the angle of the light from the flashlight or change the angle of the mirror.
- When all of the groups have been successful bring the class back together.
Invention -
- Have groups share their results and describe what they needed to do to get a rainbow of colors. Accept all answers.
- Review and ask how they might summarize what they observed.
- Ask. What is the best position for the mirror?
- What is the best position for the flashlight?
- Ask. Where the colors came from?
- Could the colors be in the light?

- What causes a rainbow to form on the wall?
- How does this experiment help you to understand something in nature?
- How did you use evidence and reasoning to understand?
- How is what you did compare to what scientists do?
- How can you use what you learned today?
- How do other people use what you learned today?
Discovery
Ask them where at home they would be able to see
Activity 2 - Milk Rainbow
Materials:
- 1 pie tin, milk, 3 different bottles of food coloring (red, blue, green), 1 bottle of liquid soap
- Lab note
Similar experiement on youTube with four colors. (2:06)
I use three colors, because they are the primary colors of light.
Focus questions:
- What happens when you mix food dyes?
Learning outcomes:
- Mix food dyes and describe what happens when they are mixed.
Suggested procedures overview:
- Put students in groups, focus their attention, and assess their initial understanding of the focus questions.
- Activity - Mix food dyes and describe what happens when they are mixed.
Exploration
- Organize learners into pair groups.
- Ask and demonstrate without doing. What will happen if you put drops of food coloring (drops are in the shape of a triangle) in a pie tin filled with milk at room temperature? Listen to responses. Do not comment on accuracy.
- Ask. What will happen if they put a drop of liquid soap right in the middle of the triangle drops of food coloring?
- Have the learners do the activity.
- Have them to be ready to share their results with the class.
Invention
- Regroup and review their results.
- them to share their observations with the class and reach a conclusion about the observations.
- Ask. Where did the colors come from? The food coloring refects light that is the color of the food coloring.
- Do they come from inside the milk? The color white is a property of the milk and is on the surface where the light can reflect the color white.
- Water?
- Food coloring?
- Soap?
- How can they change?
- Is color light?
- Where does light come from?
- Could yesterday’s activity give you an idea that might relate to this?
- Could they, like all around you have something to do with the color?
- If so what?
- What evidence and reasons do you have to support your answers?
- Soap removes or pushes food coloring in milk through a process that reduces surface tension. Dish soap breaks the surface tension of the milk and breaks down fat/protein bonds as in bonds of dirt on dishes and clothes. This causes movement as the soap molecules are attracted to and attach to fat molecules in the milk. The food coloring makes this invisible molecular rearrangement visible.
- How would a scientist answer these questions?
- How would a scientist explain what happens?
Discover
- How does what you learned apply to other things?
- Will this same reaction work with water or soda pop?
- What happens if you put the soap on the outer edge of the milk in the pie tin?
- How would a scientist answer these questions?
Activity 3 - Rainbow in a Bag
Materials:
- 1 Ziploc baggie for each student or group, 1 large sauce pan, 16 cups of water, 4 cups of cornstarch, 1.5 cups of sugar, 1 large wooden spoon, food coloring (red, blue, yellow)
- Lab notes
Prepare ahead of time a batch of goop known as rainbow stew.
Directions
- Bring the water to a boil in the pan, toss all ingredients except the food coloring, and heat until it thickens, stirring occasionally. Divide mixture into thirds.
- You may want to add food coloring (one heaping teaspoon) to make one batch red, one yellow, and the last one blue or you may want to wait and have students add it later.
- The bags may be squeezed to mix the colors together.
Focus questions:
- What happens when you mix solids of different colors?
Suggested procedures overview:
- Put students in groups, focus their attention, and assess their initial understanding of the focus questions.
- Activity - Mix solids of different colors and explain the results as the colore property of the materials is changing.
Exploration
- Organize learners into pair groups.
- Ask. How many colors can be made by combine the three primary colors of red, blue and yellow?
- Wait for responses. Mark them on the board.
- Give the learners the rainbow bags.
- Have them compare their observations
- Have them take small amounts of the primary colors and mix them.
- Have them record the colors used and the color made.
- Save some samples for later reference.
- A class chart could be made to look for patterns.
- Pepare for class sharing.
Invention
- Bring the class together and ask them.
- To report back what happened and share their data.
- Ask. What patterns they can discover?
- Explain how the colors are made.
- Where does the light come from that they see as each color?
- How did the colors form?
- Ask. Can you explain how to make different colors and how to make them get lighter or darker?
- Ask. How were you working as scientists?
Discovery
Ask. How might you use what you learned in this activity?
Activity 4 - Colors from Plants
Materials
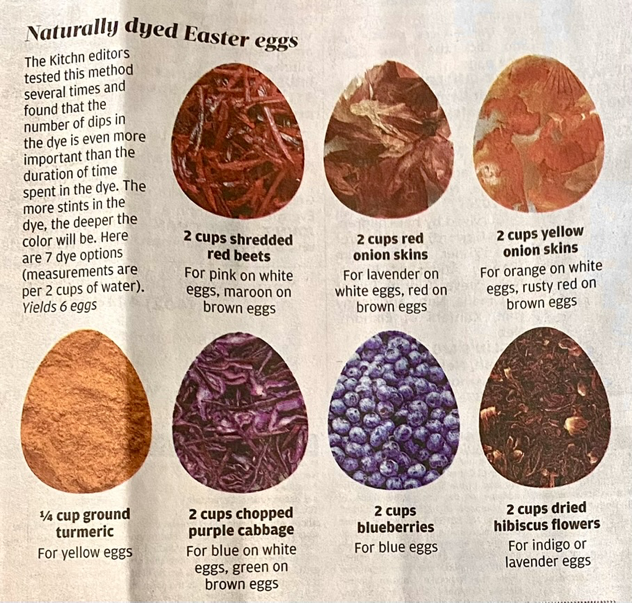
- White construction paper, markers, onion skins, flower blossoms, cranberries, bark from woodpile, leaves, beets, red cabbage, tea, carrots, blue berries
- Lab notes
Focus questions:
- How can organic materials be used to transfer color?
Learning outcomes:
- Explain how the substances in the organic materials are solutes and can be moved from their source to another solvent to make a solution that can be used as a dye.
Suggested procedures overview:
- Put students in groups, focus their attention, and assess their initial understanding of the focus questions.
- Activity - Describe how organic materials can be used to transfer color from organic material and explain how the substances in the organic materials are solutes and can be moved from their source to another solvent to make a solution that can be used as a dye.
Exploration
- Organize learners into pair groups.
- Ask. What will happen if they rub the vegetables, flowers, leaves, etc. on the white paper? pieces of the substance will rub off onto the paper
- Ask. What colors do they think can be created from the plants provided? The color on the paper will relate to the color of the organic matter used to rub it.
- Ask. Why did the colors of the plants appear on the white paper? The material was transfered physically to the paper.
- Fold white construction paper into six sections.
- Ask. Can you create a rainbow of colors on their folded white paper using the plants? accept all answers
- Record all of the different colors on a class chart.
- Have groups discuss the results.
Invention
- Share result ...
- Have groups compare their results with other groups and explain why this happens.
- Ask how this information can be used in everyday life.
- Ask. How could you tell a story of how people long ago may have come up with the idea of coloring their clothes or other object. trial and error discover that different organic materials may leave colored marks. Rub the material on them solves, see history of ochra as cosmetics. Or decide they could be rubbed on other objects.
- Ask. How would a trial and error be different from how scientists might use this information to create dyes that we use today? Accept all answers that move away from trial and error with observation and evidence to being more systematic and isolation of variables.
- How would a scientist answer these questions? Scientists might try to isolate the substances to discover which would have the color and then isolate it to make it more colorful or efficient to use.
- How do these ideas fit with the development of knowledge over the years?
Discover5
Ask. Would you like to try some ideas that people developed to use organic materials to dye stuff? Hopefully yes... activity 5
Activity 5 - Exploring Plants-Plant Dyes
Materials
- Hot water, beakers, stirring implements, various white fabrics, trays lined with paper towels, masking tape, onion skins, flower blossoms, cranberries, bark from woodpile, leaves, beets, red cabbage, tea, carrots, blueberries, safe tools for cutting, mortar and pestle for grinding, tweezers, hot mitts
- Lab notes
Focus questions:
- Can organic material be used to make dies?
Learning outcomes:
- Use organic material to make dyes and dye cloth.
Suggested procedures overview:
- Put students in groups, focus their attention, and assess their initial understanding of the focus questions.
- Activity - Use organic material to make dyes, dye cloth, and explain how dye is a solution where the solute in the solvent can be transferred to an object. Which is the process of dying ...
Exploration
- Organize learners into pair groups.
- Ask. What will happen to the water if ground-up plant parts are immersed into the water?
- What will happen if white cloth is submerged into that water?
- How and why does this happen?
- Have students cut up plants, or grind tougher materials with the mortar and pestil.
- Put it in a heat-resistant container, add hot water and stir or mash thoroughly.
- Have the them add the white fabric and allow it to soak for about 5 minutes.
- While the fabric is soaking, ask. What they think would happen if cold water was used. Would it work as well as hot water?
- Remove the fabric with tweezers and set on a tray lined with paper towels. Allow drying overnight.
Invention
- Share results.
- Ask. How did the dyes form?
- Explore with dyes by repeating these methods.
- Have them document on the towels their results.
- Ask. What will happen if we re-dye the white fabric again?
- Ask. What dyes changed the fabric the most?
- Why did this happen?
- Encourage them to share their observations as they work.
- Have the class discuss the results and journal these findings.
- Ask. What might happen if we add another substance such as alum or cream of tartar?
- Ask. What justifications do you have for these predictions.
Discover
- Ask.
Activity 6 - Tie dye
Materials
Focus questions:
- How
Learning outcomes:
- Make .
Suggested procedures overview:
- Put students in groups, focus their attention, and assess their initial understanding of the focus questions.
- Activity - Make
Exploration
- Organize learners into pair groups.
Invention
- Regroup as a class and groups demonstrate their projects.
Discover
- Review
Activity 7 - Create an activity to add color to ...
Materials
Focus questions:
Learning outcomes:
Suggested procedures overview:
- Put students in groups, focus their attention, and assess their initial understanding of the focus questions.
- Activity -
Exploration
- Organize learners into pair groups.
- Show
Invention
- Regroup as a class and groups demonstrate their projects.
- Ask.
Discover
Lab Notes for activities
Lab notes 1 - Indoor rainbow
Materials
- Glass, mirror and flashlight.
- Lab notes
Challenge
Make a rainbow with a glass, mirror and flashlight.
Lab notes 3 - Rainbow in a Bag
Materials
- Red, blue, yellow rainbow bags
Focus questions:
What are the different ways you can combine the substances in the tree bags?
Challenge
Combine the substances and see what colors can be made.
Suggestions
Trials results
Lab notes 4 - Colors from plants
Materials
White construction paper, markers, onion skins, flower blossoms, cranberries, bark from woodpile, leaves, beets, red cabbage, tea, carrots, blue berries
Focus questions:
- How can colors be transfered from the organic material to the paper?
Challenge
Explore transfering colors from organic materials.
Describe what you did and the results.
Tell a story of how people long ago may have come up with the idea of coloring their clothes or other object.
How is trial and error different from how scientists might use this information to create dyes that we use today?
How do these ideas fit with the development of knowledge over the years?
Home: Pedagogy - theory, curriculum, learning, human development, & teaching
Home: Science - knowledge base, activities, pedagogical knowledge in all dimensions