Measuring Height of Trees and other tall objects
(
buildings, poles, water towers, antennas, ...)
Overview
- Introduction
- Observing trees to find patterns
- Concepts
- Focus questions
- Materials
- Measuring trees
- Ways to measure trees & other objects
- Comparison to a known measurement
- Using shadows
- Using a clinometer
- Scale (Biltmore) Stick to measure trunk diameter, merchantable lumber, board feet, & height
- Six ways to measure height
- Tree data sheet
Introduction
This page includes ideas and information to explore and investigate the height of objects and to use that information to discover relationships of trees and other objects. Challenge your learners to organize an investigation to measure trees on your school campus or a local part.
Related shadow problem
Topic Observing trees to find patterns
Concepts
- There is a relationship between the height of an object and its shadow.
- There is a relationship between the distance from a tree and the angle from that distance to the top of that tree, and its height.
- There are relationships among species of trees.
- There are relationships among conifers.
- There are relationships
among deciduous trees.
Challenge introduction
Focus Questions
- How are trees measured?
- What measurements of trees are important?
- What does, how tall a is tree? mean? Height? Explanations for six ways to measure height.
- What does trunk size mean?
- What does the size of the crown mean?
- Are trees proportional?
- Is there a relationship to the diameter of the trunk and its height?
- Is there a relationship to the height and the trunk?
- Is there a relationship to the height and the crown size?
- Do certain types of trees have unique proportions?
- What other information can be collected about trees that is helpful for people to know?
- Why do people need to know sizes of trees?
Materials
Camera, 50 meter cord with meter marks and one meter marked in cm, protractor, clinometer, sheets of graph paper, calculator, transparency or clear hard plastic
Measuring trees introduction
Photograph and collect information about several kinds of trees. Measure the height, diameter, and crown of several similar and different kinds (species) of trees, record the data, organize it, draw it to scale, graph it, and discover patterns.
Each group collect data for a tree and reecord the data on a class table.
Background information
- Circumference of a tree can be measured directly with the cm and m cord.
- Diameter of a tree can be calculated from the circumference or estimated with a direct measurement or using a Biltmore stick.
- Crown can be measured indirectly underneath the tree on the ground with the cm and m cord.x
- Height of a tree can be estimated several ways. See six ways to measure height.
Practice measuring height of trees, buildings, poles ...
Find a tree, building, pole, or other tall object.
Guess the height.
What is your guess? ________________
Remember to label your answer as to feet and inches and meters and centimeters. A number by itself is meaningless.
At first your guesses may not be very close, but the more guesses and measurements made the more accurate you will get.
Then
Decide pick of several ways you can measure height without actually measuring it from the top to the bottom by hand.
Let's explore it!
Record data for a tree or tall object to practice.
Procedure
When you know how to measure the heiight of treees, decide where and how to collect tree data.
Procedure:
After yoiu collect the data explore it to discover what relationships you can discover.
Ways to measure trees & other objects
Comparison to a known measurement
One way is to use a person as a, measuring stick. It is easier to select a person who is three, four or five feet tall.
Have this person stand next to a pole or tree in front of it.
The measurer should move 25 - 50 feet away from both, depending on the height, the taller the further.
Use a transparent grid or a ruler.
Looking through the transparency slowly move away from them till you find a spot where the person, in front of the tree or pole, measures exactly a certain number of squares on the grid, or inches on the ruler and you can see all of the tree or pole on the grid.
Then, count how many squares on the grid the person is and how many squares there are from the ground to the top of the tree.
For example
If you use a ruler and the person standing beside the pole measured one inch, what did the tree measure in inches?
If it takes six inches to reach the top of the pole and one inch represents a person, draw that to scale on a piece of paper.
If one inch = four feet, then the tree would = 6 * 4 or 24 feet high.
Awesome!
Measure a pole or tree both ways (grid and ruler).
Record the results on graph paper, and include any notes that might be helpful.
What information do you need to remember?
Scientists often write their results so they won't forget them.
Using shadows to measure
Arithmetic is very important in science and nearly all scientists use arithmetic or other mathematics to help solve problems. If a pole or tree is located on flat ground and it is a sunny day, its shadow can be used to figure how high it is.
Take an object or person, whose height is known outside and measure the length of its shadow.
Then measure the shadow of the tree or pole of unknown height.
Student height: _______________________
Student shadow length: ________________
Tree shadow length: ___________________
It is now possible to find the tree height using this information and the idea of proportion. The student's height is proportional to the student's shadow in the same way the height of the tree is proportional to the tree's shadow's length.
Setting up the problem
Use a sheet of graph paper and draw a line to scale to represent the height of the student and another perpendicular to it to represent the length of the student's shadow.
Use the same scale and draw another line to represent the length of the tree's shadow.
Draw another line perpendicular to it to represent the height of the tree.
Compare the number of units used to draw the student's shadow to the student's height.
Use this relationship to draw the height of the tree. You can then use the scale to find the tree's height.
Setting up a proportion mathematically:
| Student height | Student shadow length | Tree height | Tree's shadow length |
|---|---|---|---|
| 4 feet | 3 feet | 21 feet |
Using your data from the previous page, find the height of different objects.
| Student height | Student shadow length | Tree height | Tree's shadow length |
|---|---|---|---|
Using a clinometer to measure height
A clinometer can be used to measure the angle of elevation of the tree or pole.
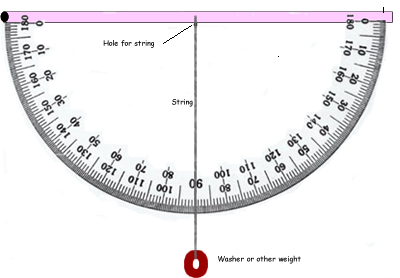
Directions to create a clinometer.
Materials
Large plastic protractor or (paper print of a protractor glued to cardboard), straw, 30 cm string, washer or other weight.
- Use the plastic protractor or the paper and cardboard protractor and tape the straw to the straight edge of the protractor.
- Use the hole in the protractor or carefully make a hole through the center of the protractor where it meets the straw.
- Push the string through the hole and tie a knot on the other side so it won't pull through.
- Tie your weight to the other end of the string.
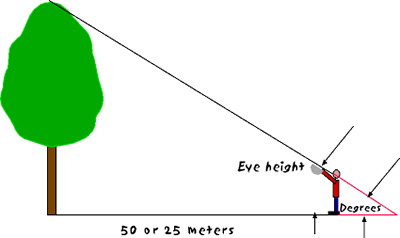
To use a clinometer, you will need two people: one to look through the straw and site the top of an object and one to read the degrees that the string makes with the protractor.
- Measure a distance, on the ground, 50 m (for tall trees) or 25 m (for small trees) from the trunk of the tree that you want to measure.
- At 50 or 25 m from the tree stand facing it with your partner. One of you sight the top of the tree through the clinometer while the other reads the degrees.
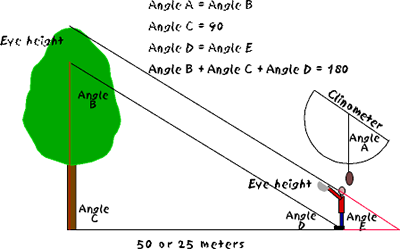
- Select a piece of graph paper and draw a base line to scale for the 25 or 50 m distance you stood from the tree.
- On one end of the 25 or 50 m scaled line draw another line perpendicular (90 degrees) to it. This line represents the height of the tree.
- On the other end of the 25 or 50 m scaled line draw a line that is (90 degrees minus the angle measured with the clinometer). You will probably need to study the diagrams below and convince yourself of what angle you measured and how to draw a scale drawing to find the height of a tree.
- The line drawn at this angle can be extended until it intersects (crosses) the line that represents the tree.
- That line segment represents the height of the tree less the height of the viewers eye.
- Use whatever scale that was used to scale the 25 or 50 m to determine the actual height of the tree.
Scale (Biltmore) Stick to measure trunk diameter, merchantable lumber, board feet, & height
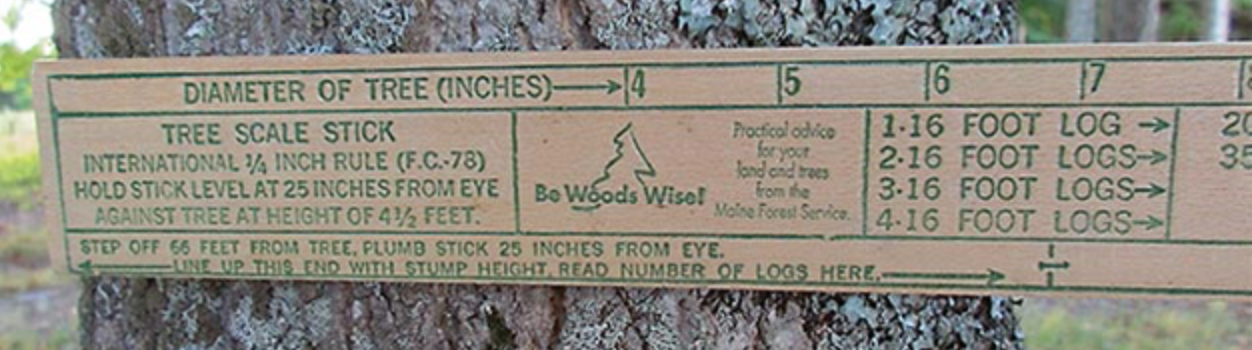
The Scale (Biltmore) Stick is a clever tool used to measure trunk diameters, heights of standing trees (distance from the ground to the top of the tree), and to estimate lumber volume or merchantable logs (measured from the stump height to the point where the tree is no longer usable). It was developed about the middle of the 18th century based on proportionality and similar triangles. It looks like a meter stick or yardstick. However, the distance between the increment marks, to measure the diameter or height, decrease as the diameter or height increases. It is used for estimates while other methods may be used for more precise measurements. However, the Biltmore Stick is still very much a part of a timber owner's tool kit and can be purchased at any forestry supply center. You can even make your own.
It is also used to measure the board foot volume of a tree with two measurements: 1. The merchantable height in 16-foot logs and 2. The diameter at 4.5 feet off the ground. The actual volume table is printed on the stick.
To measure diameter – Hold the stick four and one-half (4.5) feet off the ground, perpendicular to the tree trunk, against the tree, and about 25 inches from the eye. Align the zero mark to one side of the trunk. Without moving your head, site the other side of the trunk and see what increment on the stick is closest. The number of spaces on the stick that the trunk spans is the measurement of the trunk.
How It Works – Make a diagram. Draw a line to represent the stick. Draw a circle to represent the tree. Draw another line to represent the first line of sight. It should be perpendicular to the stick line at its zero mark and tangent to one side of the tree circle. Draw another line to represent the line of sight to the right edge of the tree. It should be 25 inches from the stick line and intersect the tangent line. It should extend so that it is tangent to the other side of the tree circle. Where the line crosses the stick line represents the diameter of the tree. Since the radius is not in a direct line, an adjustment must be made. Otherwise the reading would be much too high (the point on the tree diameter where the lines intersect out beyond the trunk).
If we pick a tree that has a diameter of 20 inches we know the radius is ten. We also know the distance from the eye to the stick is 25 inches, the standard distance. The distance from the eye to the center of the tree is the radius plus 25 inches. Using this information the angle can be found. Since the two triangles are the same, we know that the tangent of twice the angle is the stick measurement divided by the distance from the eye to the stick (tan 2a = d / 25). Now we just substitute the value of twice the angle into the formula and solve d = 25 * tan (2 * (arctan [R / (R + 25)]). you can figure out how to use an electronic device to solve the equation. If your arm is a different size than 25 inches you may want to change that value to match your arm length so it will be more comfortable.
The chart below contains the stick measurements in inches for a 25-inch reach.
Measure and mark the tree diameters on your stick that matches your values along the length of the stick. When you are finished, coat the entire stick with a clear finish such as a clear spray paint or polyurethane varnish, for durability.
| Tree | Stick | Tree | Stick | |
|---|---|---|---|---|
| 10 | 8.6 | 30 | 21.8 | |
| 11 | 9.3 | 31 | 22.4 | |
| 12 | 10.1 | 32 | 23 | |
| 13 | 10.8 | 33 | 23.6 | |
| 14 | 11.5 | 34 | 24.2 | |
| 15 | 12.2 | 35 | 24.8 | |
| 16 | 12.9 | 36 | 25.4 | |
| 17 | 13.6 | 37 | 26 | |
| 18 | 14.2 | 38 | 26.5 | |
| 19 | 14.9 | 39 | 27.1 | |
| 20 | 15.6 | 40 | 27.7 | |
| 21 | 16.2 | 41 | 28.3 | |
| 22 | 16.9 | 42 | 28.8 | |
| 23 | 17.5 | 43 | 29.4 | |
| 24 | 18.1 | 44 | 30 | |
| 25 | 18.8 | 45 | 30.5 | |
| 26 | 19.4 | 46 | 31.1 | |
| 27 | 20 | 47 | 31.7 | |
| 28 | 20.6 | 48 | 32.2 | |
| 29 | 21.2 |
Height Measurements
You can easily add height measurements to your stick, making it easy to estimate tree height. The formula for this is very easy. Use the same "reach," or distance from eye to stick. You will also need to know the distance from you are standing from the tree. A distance of 100 feet is suggested as a base. Some sticks have scales for 100 and for 66 feet (one chain).
To determine the height of the tree (or other object) hold the stick vertically at your normal reach. Align the zero point with the bottom of the tree. Read the height at the point where the top of the tree appears to intersect the stick.
To calculate the measurement on the stick (S) at a base distance of 100 feet:
S = 25 * (H / 100)
For a base of 66 feet:
S = 25 * (H / 66)
If you have a reach that is greater or less than 25 inches, you can vary the formula accordingly. Now measure your stick, and mark it. Be sure to label the scales as 100-foot base or 66 foot base.
As a final feature on your stick, mark off standard inches. This can be a great. You don't need to put all the scales on one side- there are several sides and even edges to use. Drill a hole in one end and attach a leather or nylon thong as a wrist strap. And finish with a clear coat.
To measure tree merchantable height Merchantable height refers to the length of usable tree and is measured from stump height to the cutoff point in the top. The cutoff point will vary depending on locality, product and the number of limbs.
Stand 66 feet (approximately 12 paces) from the tree you want to measure. Hold the stick in the upright vertical position 25 inches from your eye with the "number of 16 foot logs" side of the stick facing you. Usually this is on an edge of the stick.
The number of logs can be read directly off the stick starting upward from the estimated stump height. You are actually not measuring total height but are estimating 16 foot log sections. With this merchantable height estimated in logs, plus the diameter, you can estimate tree volume.
To measure tree volume: Hold the stick against tree at diameter breast height (DBH) 4.5 feet and 25 inches from your eye. Shift stick to right or left side of the tree until the zero or left end of the volume side of the stick lines up with the left edge of the tree. Sighting the right side of the stick where it touches outside bark (only moving your eyes) gives you the diameter on the top line and below this the number of board feet for trees of different numbers of logs.
To measure volume of logs: Position the "log diameter" scale across the small end of the log by placing the stick across the place that appears to be average diameter (or take several readings and average). Log volumes for different diameters and lengths from 8 to 16 feet can be read on the flat side of the stick marked "log scale".
Logs over 16 feet long are scaled as two logs allowing for taper on logs 22 feet or longer. A 20 foot log, for example, 15 inches in diameter, would be scaled as two 10 foot logs, each 15 inches in diameter
Six ways to Measure Height
| Method or Concept | Information needed | Procedure |
|---|---|---|
| Direct Measurement |
|
|
| Proportion |
|
|
| Proportion |
|
|
| Two Angular measurements and distance |
|
|
| Two Angular measurements and distance |
|
|
| Use trigonometry table |
Tree data
| Tree species | Location, time, & date | Height | Trunk | Crown |
|---|---|---|---|---|
|
||||
|
||||
|
||||
|
||||
|
||||
|
||||
|
||||
|
||||
|
||||
|
Graph paper