Earth materials
Last edited - July 22, 2025
Investigation of earth materials and their uses.
Questioning is the foundation of all learning.
The first step in rejecting not knowing is to ask, why?
Sweetland
Overview
- Overview
- Big ideas, concepts, facts, & outcomes
- Science content concepts & outcomes
- Inquiry & science process concepts
- Pedagogical overview
- Activities sequence
- Focus questions
- Materials
- Scoring guide suggestions
- Unit activity sequence
- Activity 1 - Look at sandpaper
- Activity 2 - Make a sand sculpture
- Activity 3 - Make and paint beads
- Activity 4 - Rocks in use
- Activity 5 - Making adobe bricks
- Activity 6 - Making sand paintings
- Activity 7 - Add color to sand, gravel, and pebbles to put in jar to make interesting designs.
- Quarry in a jar - Discovery
- Lab notes
- Lab note 1 - Look at sandpaper
- Lab note 2 - Make sand sculptures
- Lab note 3 - Make and paint beads
- Lab note 4 - Rocks in use
- Lab note 5 - Making adobe bricks
- Lab note 6 - Making sand paintings
- Lab note 7 - Quarries
- Support materials
A sequence of plans to facilitate a review and develop a deeper understanding of earth materials.
Materials we use in bricks and concrete blocks that form walls, glass in the windows we look through, the surfaces of our roads, and sandpaper are a few of the uses of earth materials. Minerals can be used as semi-precious stones, like gems and industrial diamonds in cutting machines and ores we use in making of different metals. A quarry is a place where sand, rocks, clay and gravel are excavated and sorted. Another name for a quarry is a sand or gravel pit. Sand matrix is the binder that holds the sand together to make sculptures durable.
We have come to depend on these many earth materials for constructions of our human built environment.
Background resources:
This plan is designed for learners who have very little prior knowledge of geophysical forces.
Related study topics:
- Rocks grades 1-2
- Rocks grades 3-4
- Rocks grades 6-8
- Soil & plants
- Erosion as destructive
- Streams & watersheds as constructive and destructive forces
- Glaciers
- Earthquake
Planning information
Learner background information
A plan designed for learners who have prior knowledge in cause and effect, use of observations to make inferences, models as explanations for observble and non observable events, and working in groups.
Intended learnings & learners thinkings
See for more information on what to include in general planning
Content concepts or outcomes
(Source concepts & misconceptions)
Big ideas and specific outcomes:
- Earth materials provide many resources that humans use.
Concepts and facts
- Humans discovered many ways to use earth's materials to benefit them.
Outcome
- Describe different ways to use earth materials.
- Use earth materials to create.
Science concepts: physical, earth, life
Big ideas:
People
depend in earth materials for the constructions we take for granted in the
human built environment. We use these materials in bricks and concrete blocks
that form walls, glass in the windows we look through, the surfaces of our
roads, and sandpaper are a few of the uses we find using the earth materials.
Minerals can be used as semi-precious stones, like gems and industrial diamonds
in the stores and ore can be used in making of different metals. A quarry
is a place where sand, rocks, clay and gravel are excavated and sorted. Another
name for a quarry is a sand or gravel pit. Sand matrix is the binder that
holds the sand together to make sculptures durable
Related concepts
- Earth materials are solid rocks and soils, water, and gases of the atmosphere.
- Rocks come in many sizes and shapes.
- Rocks change in size, shape, and other properties.
- Animals and plants can change rocks and soil.
- Rock is made of different combinations of minerals.
- Erosion is the wearing away and moving of earth.
- Soils have properties of color, particle size, and texture.
- Fossils were created long ago.
- Soil consists of weathered rocks, water, and decomposed organic materials from dead plants, animals, and bacteria. More about soil
Earth Materials' Uses
- Earth materials provide many of the resources that humans use.
- Earth materials supply nutrients, minerals, and store water to support the growth of many kinds of plants, in our food supply.
- Earth materials provide shelter, water, and nutrients for animals survival.
- The varied materials have different physical and chemical properties, which make them useful in different ways, for example, as building materials, as sources of fuel, or for growing the plants we use as food.
- Earth resources are nonrenewable.
Outcome
- Describe several uses of earth materials in their everyday lives and how they benefit from their use.
- Mining earth materials is sometimes harmful to the Earth, organisms, and humans.
- Use earth materials to create.
Anticipated learner thinkings & misconceptions
- Objects are manufactured without the need of raw materials.
- Raw materials are infinite.
- Rocks are of a different substance than sand.
Inquiry, process, & cross cutting concepts & skills
Inquiry
- When I experiment I collect observations that describe how different properties change (become variables) when objects and systems interact. This helps me make claims, explain what is happening, and to predict what might happen in the future.
- Inquiry concepts
- Process concepts
- Perspective concepts
Cross cutting
Big ideas: See also Concepts & misconceptions
Related concepts and facts
- Observational data and reasoning is used to explain interactions. Evidence is something that
is observed and can be used to understand what is happening and make predictions
about future changes.
- Models are structures that correspond to real objects, events, or classes of
events.
- Explanations are based on observation derived from experience or experimentation and are understandable.
- Pictures or symbols represent objects.
Outcome -
- Use observable data as explanations to describe earth materials and how they are used for humans benefit and harm.
Specific outcomes -
- Describe how sand is an earth material and is used in different ways.
Other possible concepts
Social concepts
- Earth materials can be used to benefit and harm people and their habits.
History of science and development of technology - perspective of science
See also Concepts & misconceptions also science, math, technology timeline
- People have practiced science and technology for a long time.
- Science develops over time.
- Science investigators such as - search tmeline
Scoring guides suggestions (rubric)
(scoring guide)
Top level
- Describe many uses of earth materials.
- Unsure of what different materials are made from.
Lower level
Strategies to achieve educational learnings
Based on learning cycle theory & method
Instructional Procedure
Pedagogical Overview
Activities Sequence to provide sufficient opportunities for students to achieve the targeted outcomes.
Make sure learners have the prior knowledge identified in the background information.
- Activity 1 - Look at sandpaper
- Activity 2 - Make a sand sculpture
- Activity 3 - Make and paint beads
- Activity 4 - Rocks in use
- Activity 5 - Making adobe bricks
- Activity 6 - Making sand paintings
- Activity 7 - Quarries
- Quarry in a jar
Focus question
Unit focus question:
How do people use earth materials?
Sub focus questions:
- How do people use sand?
- How are rocks used?
- How are bricks made?
- How can earth materials be used for art?
Materials
- Sand, different grits of sandpaper (50, 80, 100, 120, 220), hand lenses, paper, crayons, clear vials or containers for sand sculptures, paper plates, corn starch, white glue, whisk brrom, newspaper, yarn straws, tempra paint, clay, silt, pebbles, small rocks, spoons, trowel, plastic bags,
- Lab note 1 - Look at sandpaper
- Lab note 2 - Make sand sculptures
- Lab note 3 - Make and paint beads
- Lab note 4 - Rocks in use
- Lab note 5 - Making adobe bricks
- Lab note 6 - Making sand paintings
- Lab note 7 - Add color to sand, gravel, and pebbles to put in jar to make interesting designs.
- Quarry in a jar - Discover
Resources
Lesson Plans
Activity 1 - Looking at sandpaper
Materials
- Outdoor sand
- Cut small squares from larger sheets of Fine sandpaper (#150), medium sandpaper (#80), coarse sandpaper (#50), pencils or crayons, half sheets of white paper, hand lenses, paper plates, vocabulary cards with sandpaper texture words (course, medium, and fine), vial (for sand), sand, and Ziploc bags
- Lab note -
Focus questions:
- What good are earth materials?
- What are some earth materials that we use?
Learning outcomes:
- Explore sand and sandpaper.
Suggested procedures overview:
- Put learners in groups, focus their attention, and assess their initial understanding of the focus questions.
- Activity - Explore and observe outdoor sand and sandpaper sand and discover the similarities and differences.
Exploration -
- Put learners in pairs.
- Ask. Do you know of any examples of how people use sand?
- Review sand (pebbles, gravel, sand, silt, and clay) allow the learners to look at the sand with hand lens.
- Draw a picture to represent the different kinds of sand.
- Tell. We are going to explore one use of sand today: (sandpaper)
- Pass out sandpaper, and have them rub their fingers gently over the paper.
- Have them gently rub two pieces of sandpaper together to see what comes off.
- Catch the sand on a piece of paper and have them look at it with a magnifying glass.
- Ask. What do you see?
- Use the magnifiers to get a close view of the paper, different sizes and grits.
- Have them draw pictures for each of the grits.
Invention -
- Share results and discuss.
- Introduce the vocabulary for the three different textures: course, medium, and fine and relate it to the numers that maybe on the paper. (220, 120, 80, 50 or whatever. The higher the number thee finer the sand or grit.
- Ask. How is sandpaper used?
- How important is sandpaper?
- How is outdoor sand and sandpaper sand similar and different? They both have the same shapes with the outdoor sand having all different sizes. The sandpaper sand is uniform in size.
Discover - Sanpaper rubbings
- Tell. We are going to make sandpaper rubbings.
- Give each a piece of white paper and a pencil or a crayon.
- Rub the pencil or crayon on the white paper on top of the sandpaper.
- Ask. How they might label the rubbings?
- Have them label them.
- Have them identify the different textures of the sandpaper with their eyes closed, and have them use their new vocabulary words to describe the sandpaper.
- Share and compare results with others.
- What other uses is there for sand?
Activity 2 - Sand Sculptures
Materials:
- Paper plates, basins, vials, metal spoons, whisk broom and dustpan or hand held portable vac, clean sand (7 lbs.), batch of sand matrix, cornstarch, water, container for storing sand matrix, newspapers, and white glue
- Prepare Sand Matrix- 1 box (3.5 cups) of cornstarch, 3.5 cups of water.
Recipe
Sand sculpture mixture using cornstarch, water (for oobleck), and sand
Basic ratio:
- 2 parts sand (fine, clean, and dry works best)
- 1 part cornstarch
- 1 part water (adjust as needed for consistency)
Instructions:
- Mix the cornstarch and water together to form oobleck—a thick, gooey, mashed potato, consistency.
- Gradually add the sand while stirring continuously.
- This mixture should hold its shape well for sculpting. You can tweak the ratios slightly based on the sand's moisture content and the desired firmness.
- Adjust with more sand or water to achieve a moldable, firm texture that's not too runny. Carefull adding too much water and diluting the cornstarch.
Focus questions:
- Follow directions and make a sand sculpture.
Learning outcomes:
- Make a sand sculpture.
Suggested procedures overview:
- Put students in groups, focus their attention, and assess their initial understanding of the focus questions.
- Activity - Make a sand sculpture and explain sand can beused to many different shapes.
Exploration
- Put learners in pairs.
- Review the properties of sand with the learners. Shape - Size
- Ask. What is sand made of? Accept all responses.
- Ask. Is sand smaller or larger than gravel? Smaller
- Ask. What is sand made of? Small loose pieces of rock or minerals.
- Ask. How sand is like clay and how is it different? Sand is made of coarser particles and sometimes harder. Clay is finer and sometimes flexible.
- Introduce sand matrix. Tell them that a matrix is a material that holds particles or materials together and how you made it. Ingredients, amounts, (ratio) process.
- Distribute sand and matrix. Give each learner a paper plate.
- Tell them to writetheir names on them.
- Have them get 2 full vials of sand and put on paper plate.
- Add 1 heaping spoonful of matrix on top of the sand on each plate.
- Have them use their hands to mix the sand and the matrix thoroughly.
- Mold sand mixture into simple shapes or designs.
- Ask. Why they think their sculptures will stay together?
- Which ingredient(s) do they think will make them stay together.
- Clean up and allow sculptures to dry. Allow 2 days to dry.
Invention
- Ask. if they know of any other people who might use the matrix and what they might use it for?
- Ask. What are the advantages of using sand as a building material? It's small shape allows it to be put together and formed to many different shapes.
Discover
Activity 3 - Clay Beads
Materials:
- For each learner - 1 ball of clay (1"diameter), 1 piece of scrap paper, 1 piece of yarn (24"), 1 piece of soda straw
- For the class- plastic cups, painting supplies, brushes, felt markers, poster paints, tempera paints, piece of string, paper towels, newspapers, sponges, and water
- Lab notes -
Focus questions:
- How can beads made of clay?
Learning outcomes:
- Make clay beads.
Suggested procedures overview:
- Put students in groups, focus their attention, and assess their initial understanding of the focus questions.
- Activity - Make clay beads.
Exploration
- Put learners in pairs.
- Ask. What are 2 properties of clay? a) it sticks together when it is molded b) it hardens when dried.
- Explain that they will use these properties of clay to make something to hang around their necks on pieces of yarn.
- Share some techniques:
- If clay starts to dry out or cracks, dip fingers in water and smooth out the cracks
- Use a pencil or straw to make designs in the clay.
- Beads can be made by making round balls and poking a short piece of straw through the clay, leave it there and remove it when the clay has dried.
- Other shapes or trinkets can be made.
- Give each learner one chunk of clay and have them start project.
- When finished have them use sponges and paper towels to clean up the area.
Invention
- Assemble for discussion.
- Ask. What makes the clay stick together?
- Allow two days for the clay to dry. When dry have them paint the beads and dry them overnight.
- Depending on the type ofpaint used, you may want to follow up by painting the beads with another coat of clear acrylic.
- Then string beads on yarn to make a necklace.
- Ask. What are some other uses for clay? making bowls, pottery,
sculptures, artists ...
Discovery
Activity 4 - Rocks in use
Materials
- Each learner needs 1 notebook or clipboard with paper, and 1 pencil.
- Lab notes -
Focus questions:
- What kinds of earth materials are there?
- And how are they used?
Learning outcomes:
- Describe different kinds of earth materials and how they are used.
Suggested procedures overview:
- Put students in groups, focus their attention, and assess their initial understanding of the focus questions.
- Activity - Research different kinds of earth materials and make alist of them and how they are used.
Exploration
- Ask. What are the different sizes of rocks they have learned about. pebbles, gravel, sand, silt, and clay
- Write these categories on the board.
- Tell them the class will be going outside to look for earth materials.
- Divide the class into groups and have them write and observe the sizes of rocks that they see.
- Ask. Why do you think certain materials are used for certain purposes?
- Back in the classroom.
- Ask. Where did you find each of the materials.
Invention
- Make a chart and put where each material was found.
- Ask. How how the materials were used or could be used.
- Ask. What other materials could be used and where else you might be able to find them.
- Research different earth materials and list them with their uses.
Discover
Make a diagram or collage of different earth materials and their uses.
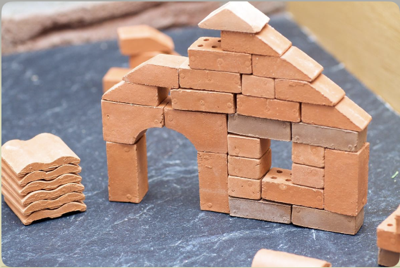
Activity 5 - Making adobe bricks
Materials:
- For each student- 1 sturdy box or aluminum mini-loaf pan, clay soil, about 1 liter, 1 handful dried grass, straw, or weed clippings, 1 half sheet of scrap paper, 1 pencil.
- For class 2 basins, 2 plastic cups, 2 metal spoons, 1 brick, 1 plastic grocery bag or bucket, 1 garden trowel or shovel, petroleum jelly, water
- Lab notes -
Focus questions:
- How are bricks made?
Learning outcomes:
- Explain how bricks are made.
Suggested procedures overview:
- Put students in groups, focus their attention, and assess their initial understanding of the focus questions.
- Activity - Explain how bricks are made.
Exploration
- Organize learners into pairs and groups.
- Ask. Do you know of a use of clay soil? make bricks or pottery
- Show students a manufactured brick if available and tell them they are going to make their own brick.
- Show them the clay and allow them to rub it with wet hands.
- Tell them the soil has a lot of clay in it.
- Ask them why it needs to have lots of clay? This is because bricks need to be hard when it is dry.
- Describe:
- Put two cups of soil in tub and add water while they are mixing a mixture with their hands to breaking up lumps and taking out the rocks.
- What do they think they can add to their mixture to make it hold together more. When it is sticky and too thick to pour have them add a handful of grass.
- To mold the bricks they should fill the pans two- thirds full and press the mud into the pan making sure it is smooth and uniform.
- Place bricks in a drying location for a day.
- Clean up basins and wash hands.
- Place any extra soil mixture in garden area.
- The next day test one brick and if you think they are dry enough to take out of mold allow them to do so.
Invention
- Ask. How long they think the bricks will need to dry before they are usable. (Allow bricks to dry for a week)
- Ask. Hhow are bricks used in their community.
- Have students write their names on flat side and build their own wall or other construction.
- Ask. What is the difference between adobe bricks and fired bricks?
- Explain to them the differences if they don’t know.
Discover
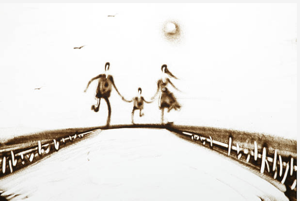
Activity 6 - Making sand paintings
Materials
- Basin, sand, black construction paper, glue
- Lab notes -
- Getty images of sand art
Focus questions:
- Can sand be used to make paintings? do
Learning outcomes:
- Describe
Suggested procedures overview:
- Put students in groups, focus their attention, and assess their initial understanding of the focus questions.
- Activity -
Exploration
- Organize learners into pairs.
- Ask Have you ever seen a sand painting?
- Discuss. How the southwest Indians used sand paintings
Sand paintings were made by the Navajo and Pueblo Indians of the American Southwest and in simpler forms among several Plains and California Indian tribes.
It is an art form. However, it is valued among the Indians primarily for religious healing purposes rather than aesthetic reasons. Its main function is in healing ceremonies. Symbolic pictures are made by trickling small quantities of crushed, coloured sandstone, charcoal, pollen, or other dry materials in white, blue, yellow, black, and red hues on a background of clean, smoothed sand. About 600 different pictures are known, consisting of various representations of deities, animals, lightning, rainbows, plants, and other symbols described in the chants that accompany various rites. The type of painting is selected by the curer. Upon completion of the picture, the patient sits on the centre of the painting, and sand from the painting is applied to parts of his body. When the ritual is completed, the painting is destroyed.
For years the Indians would not allow permanent, exact copies of sand paintings to be made. When the designs were copied in rugs, an error was deliberately made so that the original design would still be powerful. Today many of the paintings have been copied both to preserve the art and for the record.
Source Britannica
- Fill basin with sand
- Have the draw a picture on construction paper and cover the parts they want sand on with glue.
- Turn paper over in the sand and shake off excess sand.
- Students may add gravel or pebbles.
Invention
- Regroup as a class and share their art pieces with a gallery walk.
- Have them explain their sand paintings to the whole class.
Discover
Activity 7 - Quarries
Materials
- Materials- sand, gravel, pebbles, jar with lid, pencil, and paper
- Lab notes
- Getty images and videos of quarries.
Focus questions:
- What is quarry?
Learning outcomes:
- Describe what a quarry is.
Suggested procedures overview:
- Put students in groups, focus their attention, and assess their initial understanding of the focus questions.
- Activity - Visit a quarry or video of quarries and describe the processes of mining for materials and how they are used.
Exploration
- Organize learners into pairs.
- Ask. Do you know what a quarry is?
- Before leaving for field trip write a class KWL chart to find out what they want to learn about a the quarry.
- Go to a quarry on a field trip.
- Learn how rocks are made, dug up, sorted, and the uses of the different rocks that are dug up.
- Also observe the layers of rock that have been dug up.
- In the classroom ask students to explain what the rocks looked like and if they remember how they were dug up and separated (different colors, texture and wetness).
- Have them draw and label the rocks in layers that they saw at the quarry.
- Place layers of rocks in jars the way that they were in the quarry before they were separated.
- After the learners make layers place lid on jars. Have them label the types of rocks.
Invention
- Regroup as a class and groups demonstrate their projects.
- Ask. What kinds of rocks they put in their jars and what those rocks might be used for?
- Ask. Do you know of any other kinds of quarries that have different types of rocks? Granite for monuments and buildings, diamonds for jewelry, lava and other landscaping rocks.
Discover - Quarry in a jar?
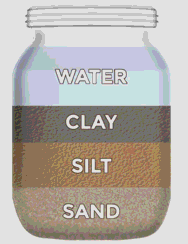
- Get a jar with a lid. Add the folowing: clay about 1/8th, silt about 1/8th, sand 1/8th, and fine gravel 1/8th. Fill the rest of the jar to 7/8ths with water. Shake the jar gently enough so that it isn't broken when the rocks hit the inside of the jar.
- Let it settle overnight.
- Observe.
- Draw a diagram of the results.
- Repeat shaking it.
- Let it settle overnight.
- Observe.
- Draw a diagram of the results.
- Repeat shaking it.
- How are the results the same and different?
- How would this relate to what is found in nature?
- A quarry?
Lab Notes for activities
Lab notes 1 - Sand exploration
Materials
- Outdoor sand, three pieces of sand paper, Lab notes
Focus questions:
- What can I learn about sand paper?
Challenge
Compare sand and sandpaper
Draw a diagram of the sand sample and label any of these that are in the sample (pebbles, gravel, sand, silt, and clay)
Draw a diagram for each piece of sandpaper.
Grit #
Grit #
Grit #
How does outdoor sand and the sand on the sandpaper compare?
Lab notes 2 - Sand sculptures
Materials
- Cornstarch, water (00bleck) and sand
Focus questions:
- How can sand be used to make art?
Challenge
Make a scupture with sand.
Recipe
Sand sculpture mixture using cornstarch, water (for oobleck), and sand
Basic ratio:
- 2 parts sand (fine, clean, and dry works best)
- 1 part cornstarch
- 1 part water (adjust as needed for consistency)
Instructions:
- Mix the cornstarch and water together to form oobleck—a thick, gooey, mashed potato, consistency.
- Gradually add the sand while stirring continuously.
- This mixture should hold its shape well for sculpting. You can tweak the ratios slightly based on the sand's moisture content and the desired firmness.
- Adjust with more sand or water to achieve a moldable, firm texture that's not too runny. Carefull adding too much water and diluting the cornstarch.
Describe your process.
What are the advantages of using sand as a building material?
Lab notes 3 - Clay Beads
Materials
- Clay, straw,
Focus questions:
- Can earth materials be used to make jewelry?
Challenge
Use clay to make ornaments for a necklace.
Describe your process.
Illustrate your results.
What are some other uses for clay?
Lab notes 4 - Rocks in use
Materials
Trip around campus and research materials
Focus questions:
What are different kinds of earth materials and how are they used?
Challenge
- Research different kinds of earth materials and make alist of them and how they are used.
- Make a list for the earth materials yoiu found around your school, where each material was found, and how it was used.
- What other earth materials could be added to your list, where else you might be able to find them, and how could they be used?
| Earth material | Where found | Uses |
|---|---|---|
|
||
|
||
|
||
|
||
|
||
|
||
|
||
|
||
|
||
|
Lab notes 5 - Making adobe bricks
Materials
Clay, grass 1 handful dried grass, straw, or weed clippings, box or pan to form bricks, water
Challenge
Make an adobe brick.
Describe what you do.
Lab notes 6 -
Materials
- Sand,
 Source Getty
Challenge
Use sand to draw a picture.
Describe what you did.
Lab notes 7 - Quarries
Materials
- sand, clay & silt, gravel, small pebbles, water, jar with a lid
Challenge
Make a quarry in a jar.
Draw a picture of your quarry.
Describe how quarries are used to provide earth materials and how they are used.
Lab notes - Quarry in a jar
Materials
- sand, clay & silt, gravel, small pebbles, water, jar with a lid
Challenge
Make a quarry in a jar. Get a jar with a lid. Add the folowing: clay or silt about 1/8th, sand 1/8th, fine gravel 1/8th, and small pebbles. Fill the jar the rest of the jar to 7/8ths with water. Shake the jar gently enought that it isn't broken when the rocks touch the inside of the jar.
Draw a picture of your quarry.
Let it settle overnight.
Observe.
Draw a diagram of the results.
Repeat shaking it.
Let it settle overnight.
Observe.
Draw a diagram of the results.
Repeat shaking it.
How are the reslult the same and different?
How would this relate to what is found in nature?
A quarry?
Describe how quarries are used to provide earth materials and how they are used.
Home: Pedagogy - theory, curriculum, learning, human development, & teaching
Home: Science - knowledge base, activities, pedagogical knowledge in all dimensions