Light and color activities for middle grades
Walk through of the creation of a
unit or packet
Introduction
The information in this article steps through the creation of a science unit for the topic of light.
Decide on a topic
The topic was selected by the students, among other topics, for them to investigate and learn about during the year. light and color is also a topic included in the school curriculum and would require some investigation if it weren't selected by students, but not as much time might have been invested.
Most students had walked by the science classroom and noticed last year students working with the overhead lights out and investigating with light boxes. At the beginning of the year when they were asked what they would like to study, they inquired about what that was all about and decided they would like to study light and color.
Their selection provided me an opportunity to modify last years unit for light and color and integrate dimensions of science: The National Science Standards Categories or dimensions:
Systems, order, and organization; evidence, models, and explanations; constancy, change, and measurement; evolution and equilibrium; form and function; inquiry; physical science; life science; earth acience; technology; personal and social; and history and nature of science along with a category for attitudes and habits of mind for doing science.
Physical science concepts for light
- Light is energy.
- Light travels in a straight line until it strikes an object.
- Light can be reflected by a mirror, refracted by a lens, or absorbed by the object.
- Light interacts with matter by transmission (including refraction), absorption, or scattering (including reflection).
- To see an object, light is emitted by the object or reflected from it and enters the eye.
- Light is reflected at an angle proportional to the angle it strikes an object.
- Light is refracted at an angle related to the angle that it enters or leaves a medium and the density of the mediums. Color is a property of light.
- White light has all colors. Black is the absence of light and/or color.
- White light can be refracted to view a spectrum.
- Light is a form of energy that can be transfered or changed to other forms of energy.
Initial planning framework to pull in other dimensions
| Unifying concepts and processes | Concepts, Generalizations, Outcomes, Activity |
|---|---|
| Systems, order, and organization | Color of the spectrum is in order. |
| Evidence, models, and explanations | Use observational evidence to explain and verify conclusions such as:
|
| Constancy, change, and measurement |
|
| Evolution and equilibrium | light is in equilibrium. |
| Form and function | The form of the materials determines the function. Transparent, translucent, opaque |
| Science as Inquiry | Investigate properties of light through experimentation. |
| Physical Science | Properties of light |
| life Science | |
| Earth Science | |
| Technology | |
| Personal and Social | |
| History and Nature of Science | Science can be used to find answers to questions. It took many years and many scientists before we understand the properties and behavior of light. Relate the history of light as wave and particle debate. |
| Attitude |
Select concepts on which to focus and unpack them.
Unpacking selected concepts
| Concept | Supporting Information | Misconceptions | Assessment: |
|---|---|---|---|
| light travels in straight lines. |
|
|
|
| light interacts with objects. |
|
|
|
| light reflects from mirrors in a regular pattern. |
|
|
|
| Lenses can be used to focus light. |
|
|
|
| An object’s color is related to the light reflected and absorbed. |
|
|
|
| Shadows are determined relative to the objects shape and relative position to the light source(s). |
|
|
|
| Experiments can be used to collect data and draw conclusions to explain interactions or events. |
|
||
| Models can be used to explain interactions which can not be observed. |
|
- Knowledge base of phyical science concepts and misconceptions
- Research on light and sight understanding
Create a sequence and possible class time
Day one: Diagnose what students know about light. Use a K W L H or other strategy. Continue to update their list during the unit
Day two: Investigate how light travels
Day three: Investigate how light interacts with objects
Day four:
- Investigate how light interacts with mirrors.
- Measure the angle of the light going into the mirror and the angle of the light reflecting from the mirror,
- Create a rule to describe how light is reflected from a mirror.
- Solve mirror Puzzles
Day five:
- Investigate how light interacts with liquids.
- Investigate how light interacts with different liquids in cylindrical containers
Day six:
- Investigate the properties of colored and white light
- Investigate light and shadows
- Investigate light and colored shadows
- Investigate colored light and the properties of color
Day seven and eight: Investigate light and the eye
- Demonstrate how the image of a lit candle can be project onto a sheet of paper by passing through a lens. Relate to eye.
- Shine light into mouth close eyes and see light above eye. Shine into sinuses above the eye and see below eye. How does the person see light? Or not?
- Chart light reflecting from objects into eye and being interpreted ... and nerve impulses sent to brain via optic nerve.
Day nine and ten: Review and ....
Collect information to combine into a unit and start writing
Unit Topic - light
Grade levels : 4-6
Date: 1970 - present
Author - Dr. Robert D. Sweetland
Philosophy
Science is inquiry about the universe. It is the creation of skills of inquiry and scientific generalizations about the physical objects, living organisms, earth and space around us and an understanding of their many relationships. Through our personal inquiries and the study of other scientist's inquiries we create a disposition for science as well as an understanding about the nature of science, its history, its personal and social perspectives, and its relationships to engineering.
This inquiry begins with children as they naturally explore their environment. Their explorations help them develop inquiry skills, create knowledge about their world and an attitude for exploration. In school the teacher continues to facilitate this development with learning experiences where students are actively involved in inquiry and communication about that inquiry in a community of science learners. This involvement begins with engaging activities that allow students to focus, reflect, and assess what they know as they explore new and different ideas. During their exploration they will experience familiar and unfamiliar information which they will try to categorize with their existing understanding or use to construct new understanding.
To assist this construction they will negotiate its meaning with themselves, other students, and the teacher until they are comfortable with their way of knowing. To push their understanding to its limits further questioning and or investigations will help them to translate and extend their understandings.
Students must have a significant amount of success in a risk free and nourishing environment to sustain their curiosity and translate it to a love of learning and science. As students engage in these hands on investigation, both teacher and student initiated, the teacher must integrate all dimensions of science. To do so will help students understand the nature of what science is, how it has been developed over the years, its effect on society and society's effect on it, how it relates to them personally, its relationship to engineering, as well the process of science practices and how it helps us understand our world. Anything less will not prepare students as citizens of tomorrow.
Overview
This unit includes hands-on activities for students to conceptualize concepts about the properties of light, the practice of science as inquiry, and the relationship of science and engineering. The activities will allow students to make individual choices based on their present understanding. This choice will personalize student learning to allow all students the opportunity to succeed at their developmental level and encourage positive attitudes.
Students will experiment in small groups, predict and record properties of light. Students will think as scientists as they observe different properties, gather evidence, make explanations, identify relationships and recreate them with light. Students will use their understanding to apply the concepts of light, by describing and demonstrating how parts of the eye interact with light and send messages to the brain to be interpreted as sight. As students conduct their investigations they will learn how science and engineering are related as well as how the practice and processes of science are related and both are used to understand our world.
Rationale
light is an important part of our world. We are surrounded by it nearly every minute of the day. It is an essential part of our lives. Without it we would be limited in our ability to communicate and would not enjoy many of the images in our world. Many children, and possibly many adults, either take light and sight for granted or otherwise just simply do not understand it.
Educated citizens are informed of the qualities of light its benefits and its harmful effects. For example, by knowing how light is energy and how it travels we can improve the quality of life and protect our eyes from light of lasers, welding arcs, the sun, and other harmful light sources. Children that study light can learn to better understand the world in which they live, make intelligent decisions, and better appreciate the world around them.
Time Allotted
10 - 50 minute sessions
Materials
Light sources and various materials to use in the investigations:
Prior Knowledge & Skills
- Know how to manipulate the materials in a safe manner.
- Know how to observe, measure, predict, and communicate results.
- Know how to work cooperatively in groups. If students do not, then cooperative lesson plan or model should be used to teach and reinforce skill necessary to work in groups cooperatively. See cooperative learning for ...
- Have a general understanding of how to draw diagrams and label them to collect observational data and to use it to answer questions.
Goals
- To enjoy science inquiry
- To learn properties of light
- To appreciate light
- To learn how to predict, inquire, and use observational evidence to answer questions.
- To learn how technology and science are related.
- To apply the knowledge and experiences gained in class to everyday life situations
Unit motivational activity
Let students explore with different objects by inserting them into the path of the light source.
Unit culminating activity
Describe how the different interactions can be made.
Assessment Methods
- A checklist of concepts and activities will be used to record student’s progress.
- Students will complete a log.
- The teacher will add to students’ anecdotal records.
- Summative assessment will be based on the understanding of the concepts through a student demonstration of the possible interactions of light with different objects.
- The following check list will be used.
Instrument Demonstration Check list
| Standard | Outcome | Yes | Comments |
|---|---|---|---|
| Personal / Social | Explain how light gets to a retina | ||
| System | Identify light systems and use the properties of the subsystems to explain the interactions | ||
| Describe the functions of the different parts of the subsystem in the interactions of the system | |||
| Physical science light |
Demonstrate | ||
| Demonstrate how to use light boxes to explain how colored shadows are created. | |||
| Engineering | Create a musical instrument. | ||
Describe how their instrument was created. |
Light Assessment
Name:
Write as much as you can for each section within the alloted time.
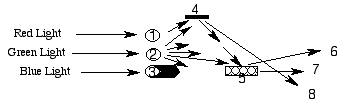
1. Explain what could be happening to the light in the light box show below.
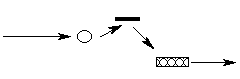
2. Explain what could be happening to the white light as it passes through the light box show below.
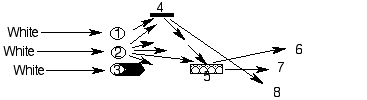
3. Explain what could be happening to the light in the light box show below.
4. Explain how you know your answers are accurate.
Test blue print
| Possible answers | Physical science: light concepts |
|---|---|
| Describe light travels in a straight line when not interacting with objects. | light travels in a straight line. |
| Describes how properties of light change when interacting with objects. Use the vocabulary: reflect, refract, & absorb. | light interacts with objects as it passes through them. |
| Describe objects: 3 as opaque, 4 as a mirrored surface , and object 5 as translucent. Use the vocabulary: opaque & translucent. Don't use transparent to describe these objects. May use as a counter example. | The surface of an object effects how light interacts with it. |
| Describe object 1 or 2 as a refractor. | light rays are refracted as they move from one medium to another. |
| Describe object 1 as focusing light onto object 4 | Lenses can be used to focus light. |
| Describe number 2 as a prism or defractor. | White light is a combination of many colors. |
| Describe light passing through object 1, 2, 3, as a result of its color. | An object’s color is related to the light reflected and absorbed. |
| Describe object 3’s shadow. | Shadows are determined relative to the objects shape and relative position to the light source(s). |
Scoring guide for physical science: light concepts / Rubric
Upper level: describes the path of light and it's interactions with objects as regular and dependent on their properties of matter or structures as transparent, opaque, translucent, reflective, and refractive.
Middle level: describes the path of light as a straight line that can be reflected, refracted, and absorbed.
Low level: describes light as traveling from a source to a receiver in a straight line.
Test blue print for processes and practice of science
| Processes | |
|---|---|
| Observations can be used to explain properties of objects. | Uses data as observations to support descriptions. |
| Observations can be used to infer interactions. | Uses data to make inferences. |
| Models can be used to explain and make predictions. | Question four |
| Attitude | Express curiosity by doing experiments recording information, asking pertinent questions, or expressing wonder. |
| Vocabulary | Uses these words in their descriptions.
|
Creating lesson plans for each day
Plan for Investigate how light travels (see log)
Objective - Manipulate 3x5 cards in the light from a light source to determine the path of light and describe their conclusions.
Focusing Question: How does light move?
Materials
Learner log, three or four 5x8 in. cards with a hole punched in the center, ruler, a small wooden block for each, scissors, clay/glue/tacks, light box as source or flashlight.
Exploration procedure
- Ask, How does light move?
- Ask, students how they might find an answer to the question.
- If needed show them the materials (cards, blocks, clay, and light source) and ask how they might use them to answer the question.
- If students do not think of an answer give them instructions on how to manipulate the cards with a hole punched in each to see if they can find the direction and way light moves.
- Assign groups.
- Ask how to record the data.
- Ask if there are any more questions before you start.
- Ask students what they are going to do.
- Students do the experiment and teacher cruises the room.
Student directions in student log for light and color:
- Prepare the light source with a polka-dot mask.
- Use the three cards with polka-dot holes in the center and clay.
- Place the cards so light will pass through all three cards.
- Record your results.
Invention procedure
- Have the students put materials aside and move to their desks.
- Ask the students what they discovered from the experiment.
- listen to the students and move on when the time is appropriate.
- Ask the students how to display the results. Example below.
- See if students will discuss that the cards blocked the light and that light travels in a straight line.
- Ask students to describe how the light disperses and that it travels in a straight line. light is not a one point source therefore, it is coming from the source traveling through the hole in many lines that are not parallel. This could be one explanation of how the light spreads out in a ray.
![]()

Discovery procedure
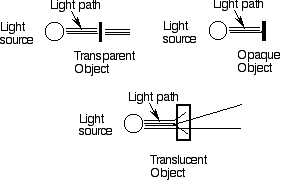
Use concept (How light travels and interacts with different objects) to explore new concept in the next investigations. (light interacts with different objects differently (opaque, transparent, translucent).
Plan for Investigate how light interacts with different objects (see student log)
Objective - Use 3x5 cards to rank order the amount of light that passes through each material (transparent, translucent, opaque), create a reason to explain how the light interacts with different materials differently, create a model to explain the interaction based on the observational data, and discuss these ideas in a class discussion.
Focusing Question: How does light interact with different objects?
Materials: 10-20 3x5 in. cards, ruler, a small wooden block for each scissors, card, glue/tacks, flashlight or projector, newspaper, clear drinking glass, wax paper, clear plastic food wrap, ice cubes, aluminum foil, cardboard, brown paper bag, plastic, glass of water, wall/door, glass of milk, lab sheet, wood
Exploration procedure
- Ask What are properties of light? Start a list on board. If a student does not mention about how light travels ask them. Save the properties of light chart to add to it each day. Have students add to their list in their student log.
- Ask How do objects interact with light?.
- Today we’ll continue to study the nature of light and how different materials interact with it.
- I have these materials for you to use cards and light source and materials to test (newspaper, glass, wax paper, clear plastic food wrap, plastic strips, aluminum foil, cardboard, brown paper bag, wood, glass of water, glass of milk, ice cubes,...)
- Discuss with students what they will do. If students do not think of using the cards to measure the amount of light, then wait until someone suggests or desires to measure the amount of light and ask how the cards could be used? May want to hold a card in front of light source and add cards until light is blocked.
- Ask how they are going to do the experiment.
- Ask the entire class what two pieces of information they will record for each object. (Does light travel through the objects? And if it does, Through how many cards does light travel?)
- Assign groups.
- Darken the room, have them do the experiment, record the data in his or her log book, and you cruise the room.
Student Directions in science log for light and color:
- Place the objects in the path of the light.
- If light passes through the object, then put a card on the far side of the object.
- If light passes through the card, then add cards until it does not.
- Record your results as zero cards = object blocked all light or the number of cards needed before the light was blocked.
Invention procedure
- Have the students put materials aside and move to their desks.
- Ask the students what they discovered from the experiment.
- listen to the students and move on when the time is appropriate.
- Ask the students how to display the results.
- Draw the chart on the board or on a transparency.
- Have students record their results.
- Discuss the results.
- Ask how they can organize it into categories.
- Try to lead them to three categories.
- Define the categories: transparent, translucent, and opaque.
- Ask if they can make a model (draw a diagram) to show how light interacts with the objects.
- Have students draw pictures.
Vocabulary:
- Translucent: an object that reflects or absorbs enough light so that an object can’t be seen through it, but light passes through it.
- Transparent: an object that allows things to be seen clearly through it because it absorbs or reflects little light.
- Opaque: an object that reflects or absorbs visible light.
Discovery Activity procedure
Use ideas with following investigations. Next activity is light interactions with mirrors.
Plan for Investigate flat mirrors (see student log)
Objective - Manipulate mirrors to draw incident and reflected rays, communicate the results to the class and resolve any differences based on observational data.
Focusing Question: Do all flat mirrors reflect light in a particular manner?
Materials: (for each group)1 rubber ball, 1 set of color cards, 1 mirror, 2 yellow rubber bands, 1 magnifying glass, gravel, 1 small plastic dish, 1 book, a light source, sheets of white paper, ruler, mask with slit, flat mirrors, protractor, student log
Exploration procedure
- If students have a questions about light or mirrors, then use it to introduce the activity. If the lesson is to be teacher directed, then take a mirror and turn it a variety of ways to shine a spot of light around the classroom.
- Tell students they are going to observe how mirrors interact with light.
- Hand out experiment directions. (see below)
- Have the students read the directions
- Ask students to explain or model what they will do.
- Cruise the room while the students collect the data
Student Directions in student log for mirrors:
- Put a mask with one slit on the light box.
- Place a sheet of paper flat on the table.
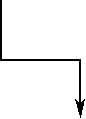
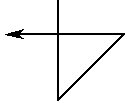
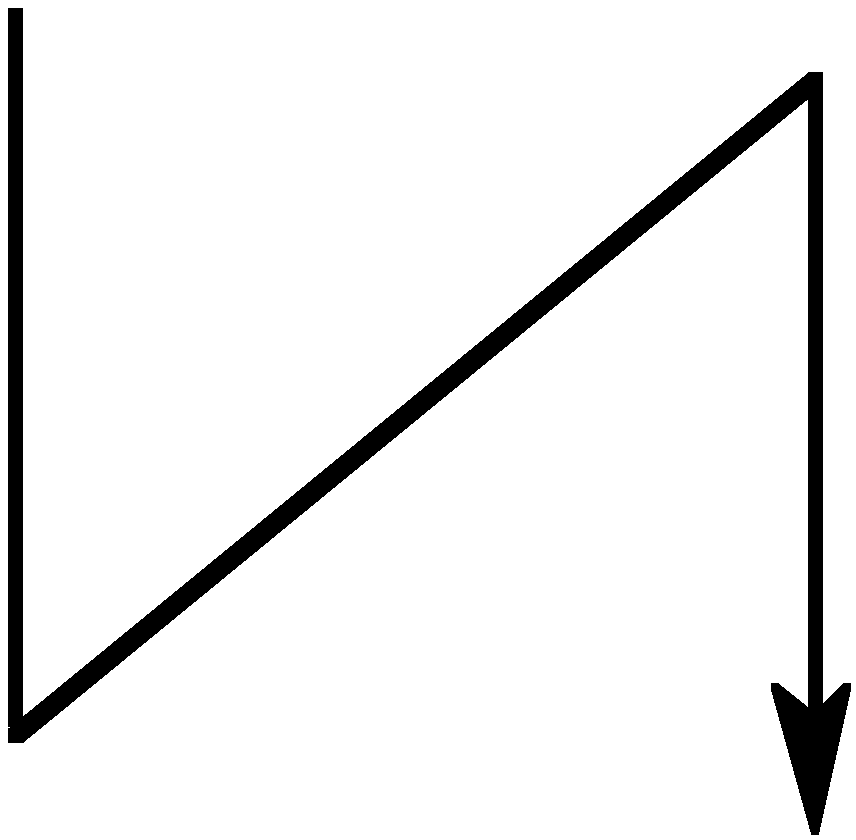
- Draw how the light interacts with the mirror (if need to give hint: draw a line for the light going into the mirror, trace around the mirror, and draw a line for the light reflecting from the mirror).
- Draw arrows to show the direction of the light.
Invention procedure
- Have the students set the equipment aside and draw their diagrams on the board.
- Ask the students if they see any pattern.
- If any students seem interested pass out protractors and have them measure the angle of the light going into the mirror and the angle of the light reflecting from the mirror.
- Have students state and write a rule to describe how light is reflected from a mirror.
- Introduce vocabulary.
- Use string and mirror back and pose the challenge to have two students stand so they can see each other in mirror when it is turned around.
- Have students relate what they learned to a ball bouncing.
Vocabulary:
- Incident ray: the light ray going into the mirror.
- Reflected ray: the light ray going out of the mirror.
- Absorb: to take in light.
- Reflect: to bounce or redirect light.
- Diffuse: to reflect in different directions.
Discovery Activity procedure
-
Students use what they learn to solve mirror puzzles.
Plan for Investigate mirror puzzles (see student log)
Objective - Manipulate mirrors to create patterns of reflected rays, communicate the results to the class and resolve any differences based on observational data.
Focusing Question: Can you solve these puzzles?
Materials: mirror patterns in student log and mirrors
Exploration procedure
Student Directions in student log for light and color:
- Challenge students to use the light box and mirror(s) to create patterns similar to the following.
- Tell them when they know how to place the mirrors to make the pattern. Draw and label where you would place the mirror for each pattern that you are able to make.
- Cruise the room while the students collect the data.
- When students finish challenge them to make some of their own and have classmates solve them.
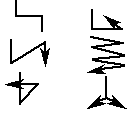
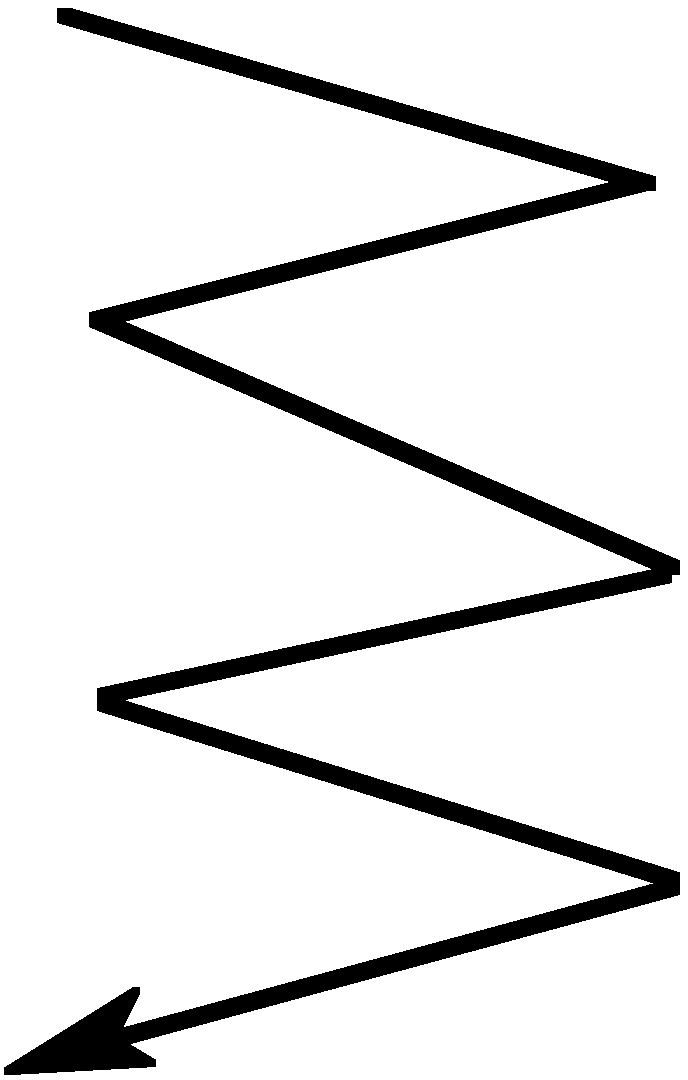
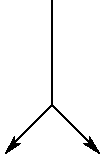
Mirror Patterns?
Invention procedure
- Have the students set the equipment aside and draw their diagrams on the board with the placement of mirrors.
- Have students discuss and verify the data with the observations they collected.
Discovery Activity procedure
Refraction activities
Plan for Investigate refraction (see student log)
Objective - Students will observe three or more activities and analyze the results to describe what happens to light when it passes from one medium to another.
Focusing Question: Have you ever tried to drop a coin into the small cup inside a larger cup filled with colored water?
Materials: pencil, cup, penny, butter tub,
Exploration procedure
Ask if they have you ever tried to drop a coin into the small cup inside a larger cup filled with colored water?
Student Directions in student log for light and color:
- Draw a sketch of how light is shining on the pencil, reflecting to your eye and how you see the pencil.
- Fill the clear container with water and insert the pencil. Observe the pencil seems bent. Sketch how light travels from a source to the pencil, reflects and travels to your eye.
- Discuss.
- Place the butter dish with the penny in the center of a table or desk and have students gather around so all can see the penny. Have them back up so the penny just disappears. While the are stationary pour water into the butter dish until the penny appears.
- Draw before and after sketches.
Invention procedure
Discuss observations and draw light reflected from the coin and pencils before water and after water.
Discovery Activity procedure
Refraction activities with different liquids in different containers.
Plan for Investigate different liquids and refraction (see student log)
Objective -
- Illustrate how light passes through liquids of different densities.
- Illustrate how an image passes through a convex lens.
- Relate the lens experiment to how an eye works.
- Tell how the lens and eye experiment relate to a camera
Focusing Question:
Materials:
Exploration procedure
Student Directions in student log for light and color:
Invention procedure
Discovery Activity procedure
Plan for Investigate light and color (see student log)
Objective -
- Describe the resulting color when different colors of light (red, blue, and green) are mixed.
- Describe how shadows are made with different colors of light.
- Describe the color of different colored objects placed in colored light (red, blue, and green).
Focusing Question:
Materials:
Exploration procedure
Student Directions in student log for light and color:
Invention procedure
Discovery Activity procedure
Plan for Investigate shadows shape, dimensions, and area (see student log)
Objective - Describe shadows shape, dimensions, and area.
Focusing Question:
Materials:
Exploration procedure
Student Directions in student log for light and color:
Invention procedure
Discovery Activity procedure
Log for light and Color
Name:
What do you know about light?
list what you know about light:
(continue to add what you learn during your study of light and color)
Purpose: Investigate how light travels.
Materials: light source, mask with polka dot slit, sheets of white paper, cards with holes, clay
Procedure:
1. Prepare the light source with a one-polka dot mask.
2. Use three 3X5 inch cards with holes punched in the middle and clay.
3. Arrange the cards so light passes through all three holes.
4. Record your results.
Purpose: Investigate how light interacts with objects.
Materials: light source, mask with slit, sheets of white paper, wax paper, newspaper, cardboard, brown paper, glass, aluminum foil, plastic strips, plastic bag, cloth, wood strips, 3x5 cards, ice,...
Procedure:
1. Prepare the light source with a one-slit mask.
2. Place the objects in the path of light.
3. If light passes through the object, put a 3x5 card on the far side of the object.
4. If light passes through the card, then add cards until it does not
5. Record your results.
Purpose: Investigate how light interacts with mirrors.
Materials: light source, mask with slit, sheets of white paper, flat mirrors, ruler, protractor
Procedure:
1. Put a mask with one slit on the light box.
2. Place a sheet of paper flat on the table.
3. Draw how the light interacts with the mirror. (Hint: draw a line for the light going into the mirror, trace around the mirror, and draw a line for the light reflecting from the mirror.)
4. Did you draw arrows to show the direction of the light?
Brain buster: Measure the angle of the light going into the mirror and the angle of the light reflecting from the mirror. Think of a rule to describe how light is reflected from a mirror.
Mirror Puzzles:
1. Use the light box and mirror(s) to make a pattern similar to the following.
2. Draw and label where you would place the mirror for each pattern that you are able to make.
 |
 |
 |
 |
 |
Make some of your own and have classmates solve them.
Purpose: Investigate how light interacts with liquids.
Materials: pencil, clear container, butter dish with penny glued to bottom center, and water.
Procedure:
1. Draw a sketch of how light is shining on the pencil, reflecting to your eye and how you see the pencil.
2. Fill the clear container with water and insert the pencil. Observe the pencil seems bent. Sketch how light travels from a source to the pencil, reflects and travels to your eye.
3. Discuss.
4. Place the butter dish with the penny in the center of a table or desk and have students gather around so all can see the penny. Have them back up so the penny just disappears. While the are stationary pour water into the butter dish until the penny appears.
5. Draw before and after sketches.
Purpose: Investigate how light interacts with liquids.
Materials: light source, mask with one slit, sheet of white paper, rectangular container, protractor, alcohol, glycerin, oil, water, colored filters, and ruler.
Procedure:
1. Use the mask with one slit to make a light ray.
2. Put a white sheet of paper on the desk.
3. Pace a rectangular container on top of the paper so that the light ray shines through the box at an angle other than 90 degrees.
4. Rotate the box to see how changing its position changes how the ray is refracted.
5. Select a position and sketch the light ray and box on your paper.
6. Measure the angles.
7. Repeat the process with different liquids in the box until you discover a pattern.
8. Draw what you observed and describe how the angles compare?
Purpose: To investigate how light interacts with different liquids in cylindrical containers.
Materials: light source, mask with two slits, sheet of white paper, protractor, alcohol, glycerin, oil, water, and ruler.
Procedure:
1. Put the two-slit mask on the light source.
2. Place a cylindrical container in the beams.
3. Record your observations.
4. Record your results.
Purpose: Investigate the properties of colored and white light.
Materials: light source, white paper, color filters, colored paper.
Procedure:
- Predict what color will be reflected onto a white paper when you shine white light on different colored papers and try to reflect the light onto the white paper as if it was a mirror.
- Write your predictions on the chart.
- Try it and write your results on the chart.
| Prediction | Results | |
| Red paper | ||
| Green paper | ||
| Blue paper | ||
| Other paper |
Purpose: Investigate the properties of colored and white light.
Materials: light source, white paper, color filters, colored paper, mirrors, set of filters.
Procedure:
1. Predict what color will be made when you reflect two or more different colors onto white paper.
2. Write your predictions on the chart.
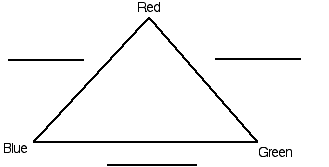
3. Try it and record your results on the triangle chart.
| Colors | Prediction |
| Red mixed with green | |
| Red mixed with blue | |
| Green mixed with blue | |
Record the colors on the triangle below.
Purpose: Investigate light and shadows
Materials: light source, white paper, and different objects.
Procedure:
1. Place a white sheet of paper on the table so the light source will shine over it.
2. Place an object in the light.
3. Sketch the shadow.
4. Repeat with other objects.
5. Make a shadow puzzle activity for your classmates.
Purpose: Investigate light and colored shadows
Materials: light source, white paper, colored filters, and rods
Procedure:
1. Place a white sheet of paper on the table so a three-colored light source will shine over it.
2. Place a rod vertically in red light.
3. Sketch the ray of light, rod, and shadow.
4. Record the color of the shadow and ray.
5. Explain your results.
6. Place a stick vertically so that it is in red and blue light
7. Sketch the rays of light, rod, and shadow
8. Record the color of the shadows and rays
9. Explain your results
10. Place a rod vertically so that it is in red, blue, and green light
11. Sketch the rays of light, rod, and shadow
12. Record the color of the shadows and the rays
13. Explain your results
Purpose: Investigate colored light and the properties of color.
Materials: light source, white paper, colored filters, tunnel, and different colored objects
Procedure:
- 1. Cover the opening of the box with a red filter.
- 2. Place a tunnel on the table so the red light will shine into it.
- 3. Place a red object in the tunnel and record the color it appears.
- 4. Explain why it appears this color.
- 5. Predict what color a green object will appear when placed in red light.
- 6. Try it. What did you observe?
- 7. Explain why it appears this color.
- 8. Predict what color a blue object will appear when place in red light.
- 9. Try it. What did you observe?
- 10. Explain why it appears this color.
- 11. Predict what color a yellow object will appear in red light.
- 12. Try it. What did you observe?
- 13. Explain why it appears this color?
Purpose: Investigate colored light and the properties of color.
Materials: light source, white paper, colored filters, tunnel, and different colored objects
Procedure:
1. Place a green filter on the light source
2. Write your prediction for the color of objects listed in the table
3. Do the experiment and record your observations and explanations
| Color of object | Predicted color | Observed color | Explanation for color observed |
| Green | |||
| Red | |||
| Blue | |||
| Yellow | |||